Update (1/24/2019)
This post is mostly about building your own docker images. If you're interested in getting up and running fast using Gravwell+Docker, head over to our docs that cover our pre-built images:
https://dev.gravwell.io/docs/#!configuration/docker.md
Overview
For this blog post we are going to go over the deployment of a distributed Docker-based Gravwell cluster. We will use Docker and a few manageability features to very quickly build and deploy a cluster of Gravwell indexers. By the end of the post we will have deployed a 6 node Gravwell cluster, a load balancing federator, and a couple ingesters. Also, the six node “cluster” is also going to absolutely SCREAM, collecting over 4 million entries per second on a single Ryzen 1700 CPU. You read that right, we are going to crush the ingest rate of every other unstructured data analytics solution available on a single $250 CPU. Lets get started.
Release 2.0
Gravwell’s 2.0 release saw several new high availability features which enable large, fault tolerant, and geographically distributed Gravwell clusters. The 2.0 release establishes Docker as a first class citizen for deployment. Using environment variables, it is easy to rapidly roll out a Gravwell cluster using Docker.
Release 2.0 marks a major milestone in reliability and ease of deployment. The myriad of improvements and new features can be found in the change logs, or go checkout our release announcement post.
Getting Started
To get started we are going to build a few Docker images that are primed for automated deployment. We will be starting with the base Dockerfiles that are provided and documented at gravwell docs. We will be building Docker images for the following components:
- Indexer
- Webserver
- Federator
- Simple Relay
- Netflow
The first step in building Gravwell Docker containers is to ensure you have access to Docker. Docker supports a lot of different host operating systems using several different virtualization technologies. We are going to be using Linux and the Kernel Namespaces containerization technology, but the steps should be very similar for other host operating systems. To test if you have access to Docker and can build images, issue the docker info command. You should see a dump of information about your system that looks similar to the following:
kris@box:~$ docker info
Containers: 1
Running: 0
Paused: 0
Stopped: 1
Images: 5
Server Version: 1.13.1
Storage Driver: overlay
Backing Filesystem: f2fs
Supports d_type: true
Logging Driver: json-file
Cgroup Driver: cgroupfs
Plugins:
Volume: local
Network: bridge host macvlan null overlay
Swarm: inactive
Runtimes: runc
Default Runtime: runc
Init Binary: docker-init
containerd version: aa8187dbd3b7ad67d8e5e3a15115d3eef43a7ed1
runc version: 9df8b306d01f59d3a8029be411de015b7304dd8f
init version: N/A (expected: 949e6facb77383876aeff8a6944dde66b3089574)
Security Options:
apparmor
seccomp
Profile: default
Kernel Version: 4.13.0-37-generic
Operating System: Ubuntu 17.10
OSType: linux
Architecture: x86_64
CPUs: 16
Total Memory: 62.93 GiB
kris@box:~$
If the command does not exist or if an error is displayed, visit docker docs to get a docker installation sorted out.
The second step in building a Gravwell Docker container is obtaining an installation package. If you do not have access to a Gravwell release, contact sales@gravwell.io for a demo release. We will be using the official version 2.0.1 release packages for the Indexer, Webserver, and Federator components.
Building Docker Images
For the purpose of this post we are going to build the smallest Gravwell container possible using a busybox image that is freely available on the Docker hub (busybox). Any reasonably up-to-date Linux image will do (kernel 3.2+); for bare-metal deployments we prefer Debian based distributions but the installers will happily support any distribution that uses SystemD.
We are going to be starting with a very minimal gravwell.conf file that establishes two wells: one for netflow and pcap, and one for everything else. Notice the lack of Indexer-UUID, Webserver-UUID, Ingest-Auth, Control-Auth, or any Backend-Target directives; we will be providing them via configuration variables during deployment.
[global]Log-Level=INFOWeb-Port=443[Default-Well]Location=/opt/gravwell/storage/default/[Storage-Well "netflow"]Location=/opt/gravwell/storage/rawTags=pcapTags=netflow
Building The Indexer Container
First we are going to build the Indexer container using a Dockerfile which looks like so:
FROM busyboxMAINTAINER support@gravwell.ioARG INSTALLER=gravwell_installer.shARG CONFIG=gravwell.confCOPY $INSTALLER /tmp/installer.shCOPY $CONFIG /tmp/gravwell.confRUN /bin/sh /tmp/installer.sh --no-questions --no-webserver --use-config /tmp/gravwell.confCMD ["/opt/gravwell/bin/gravwell_indexer"]
The Dockerfile looks for an installer named “gravwell_installer.sh” in the current working directory, but we can provide a build argument to specify our installer (gravwell_installer_2.0.sh). We build the container using the docker build command and a few additional arguments:
docker build --ulimit nofile=32000:32000 --compress --tag gravwell:indexer_2.0 --build-arg INSTALLER=gravwell_installer_2.0.sh --build-arg CONFIG=gravwell.conf .
Additional Docker Build Arguments
--ulimit nofile=32000:32000
Gravwell is designed to scale wide which means lots of threads, file handles, and network connections. The --ulimit argument tells Docker to allow the container to really stretch its legs. Without the ulimit directive Docker will limit access to resources, causing errors.
--compress
Compress directs Docker to compress the resulting docker image.
--tag gravwell:indexer_2.0
Tag the docker image as being part of the gravwell repo and named indexer_2.0.
--build-arg INSTALLER=gravwell_installer_2.0.sh
Tell Docker that we want to override the INSTALLER variable in the Dockerfile with the value “gravwell_installer_2.0.sh”, basically setting which Gravwell installer to use.
--build-arg CONFIG=gravwell.conf
Tell Docker that we want to override the CONFIG variable in the Dockerfile with the value gravwell.conf.
The build command should display the progress of each step, as as the output from the installer, culminating with a success message and the Docker image ID.
Successfully built 2e844379edae
Building The Webserver Images
Building the Gravwell webserver container is an identical process, with two small changes in the Dockerfile. First change --no-webserver to --no-indexer; then change the CMD parameter to launch the webserver instead of the indexer. Here is the complete webserver Dockerfile for completeness:
FROM busyboxMAINTAINER support@gravwell.ioARG INSTALLER=gravwell_installer.shARG CONFIG=gravwell.confCOPY $INSTALLER /tmp/installer.shCOPY $CONFIG /tmp/gravwell.confRUN /bin/sh /tmp/installer.sh --no-questions --no-indexer --use-config /tmp/gravwell.confCMD ["/opt/gravwell/bin/gravwell_webserver"]
Remember to build the webserver with a new tag. In this case we are going to tag the webserver as webserver_2.0 in the gravwell repo:
docker build --ulimit nofile=32000:32000 --compress --tag gravwell:webserver_2.0 --build-arg INSTALLER=gravwell_installer_2.0.sh --build-arg CONFIG=gravwell.conf .Building a Federator ingester is almost identical to the indexer and webserver build process. The docker file we will use looks like so:
FROM busyboxMAINTAINER support@gravwell.ioARG INSTALLER=federator_installer.shARG CONFIG=federator.confCOPY $INSTALLER /tmp/installer.shCOPY $CONFIG /tmp/federator.confRUN /bin/sh /tmp/installer.sh --no-questions --use-config /tmp/federator.confCMD ["/opt/gravwell/bin/gravwell_federator"]
The minimal federator.conf file that we will inject into the Docker image is missing backend targets and secrets, which we will inject at run time using environment variables. We are enabling the ingest cache for the Federator and enabling a single IngestListener with the hardcoded secret “SuperHardSecrets” (Shhhh, no one will ever guess):
[Global]Insecure-Skip-TLS-Verify=trueIngest-Cache-Path=/opt/gravwell/cache/federator.cacheMax-Ingest-Cache=1024[IngestListener "base"]Ingest-Secret = SuperHardSecretsCleartext-Bind = 0.0.0.0:4023Tags=syslogTags=cowbell
Building the Federator using the installer is almost identical to building the indexer and webserver images:
docker build --ulimit nofile=32000:32000 --compress --tag gravwell:federator --build-arg INSTALLER=gravwell_federator_installer_2.0.1.sh --build-arg CONFIG=federator.conf .
Once you have built both the indexer, webserver, and federator containers the command docker images should output a list of all your local docker images, including the newly built Gravwell indexer and webserver images:
REPOSITORY TAG IMAGE ID CREATED SIZEgravwell indexer_2.0 2e844379edae 8 minutes ago 82 MBgravwell webserver_2.0 61cba91d6c44 2 minutes ago 82 MBgravwell federator 1d1537b9399b 4 minutes ago 13.6 MBbusybox latest f6e427c148a7 4 weeks ago 1.1 MB
A Word of Warning
While the ingesters are freely distributed and/or open source, the core Gravwell product (Indexer and Webserver) is not. It is against the licensing terms to distribute or share a Gravwell license (which was installed when we built the Indexer and Webserver images). DO NOT upload your Indexer or Webserver docker images to the public Docker hub, your license file and distribution are tied to the newly built container. Gravwell reserves the right to terminate leaked and/or shared licenses.
Building Docker Images From Source
The installers make building a Gravwell container extremely easy, but if you have rolled your own ingester using the Gravwell ingest API or you are using one of the many ingesters that do not have formalized installers you will have to perform a few more steps. This section will lay out the steps required to manually prep a Docker image using an ingester built from source. Before you begin, make sure you have a functioning golang installation, preferably using Go version 1.10+. We will be using a Debian based Linux distribution as the host, but we will be building statically linked binaries so it doesn’t matter which distribution you build on or which container we ultimately deploy to.
Building A Simple Relay Container
The first step in building the Simple Relay container is to build Simple Relay. We want to make sure that we build a static binary (the busybox image most likely doesn’t contain the same shared objects as your host OS, so we need to make sure the binary has everything). If your Go installation is functioning properly, it's as simple as:
CGO_ENABLED=0 go install github.com/gravwell/ingesters/SimpleRelaycp $GOPATH/bin/SimpleRelay .
The two commands shown above perform the following two steps:
- Retrieve the simple relay ingester directly from github and build it
- The CGO_ENABLED=0 prefix tells the Go compiler to disable CGO, enabling a static binary.
- The resulting binary is directly installed in your $GOPATH directory.
- Copy the resulting binary from the $GOPATH to our current working directory.
Now that we have our statically compiled Simple Relay ingester binary, let’s lay out a very minimal simple_relay.conf configuration file. The configuration file is going to listen on UDP port 514 for syslog messages, as well as TCP port 7777 for any line broken log entry:
[Global] Connection-Timeout = 0 Insecure-Skip-TLS-Verify=true Log-Level=INFO#basic default logger, all entries will go to the default tag[Listener "default"] Bind-String="0.0.0.0:7777"#syslog listener[Listener "syslog"] Bind-String="0.0.0.0:514" Tag-Name=syslog Reader-Type=rfc5424 Assume-Local-Timezone=true
The Dockerfile for building out the Simple Relay ingester is a little more complicated, as it can’t rely on the installer to build all the necessary directories (it’s only about 6 more commands). Below is a pretty generic Dockerfile that can be used to build almost any type of Gravwell ingester:
FROM busyboxMAINTAINER support@gravwell.ioARG BIN=ingesterARG CONFIG=ingester.confRUN mkdir /opt/RUN mkdir /opt/gravwellRUN mkdir /opt/gravwell/logRUN mkdir /opt/gravwell/etcRUN mkdir /opt/gravwell/binRUN mkdir /opt/gravwell/cacheCOPY $BIN /opt/gravwell/bin/ingesterCOPY $CONFIG /opt/gravwell/etc/$CONFIGCMD ["/opt/gravwell/bin/ingester"]
Make sure to provide the simple_relay.conf file via the CONFIG build-arg and the statically linked SimpleRelay binary as the BIN build-arg:
docker build --ulimit nofile=32000:32000 --compress --tag gravwell:SimpleRelay --build-arg BIN=SimpleRelay --build-arg CONFIG=simple_relay.conf .
Examining the new Docker image you just built, you might notice that it is smaller than the image built with the installer. These images built by hand, contain only what we need. We can shrink it even further by stripping symbols out of the statically compiled Simple Relay binary using the -ldflags "-s -w":
CGO_ENABLED=0 go install -ldflags '-s -w' github.com/gravwell/ingesters/SimpleRelay

Lone Starr would be proud.
Building A Netflow Collector Container
Constructing the netflow container is extremely easy now that we have a highly generic Dockerfile. The netflow collector will listen on port 2055 for netflow v5 records, apply the “netflow” tag, and relay them on to the indexers. The flow.conf file we are using:
[Global] Insecure-Skip-TLS-Verify=true[Collector "netflow v5"] Bind-String="0.0.0.0:2055" #we are binding to all interfaces Tag-Name=netflow #Lack of a Flow-Type implies Flow-Type=netflowv5
Building the container just requires another go install to build the binary and reusing the Dockerfile we already have:
CGO_ENABLED=0 go install -ldflags "-s -w" github.com/gravwell/ingesters/netflowcp $GOPATH/bin/netflow .docker build --ulimit nofile=32000:32000 --compress --tag gravwell:netflow --build-arg BIN=netflow --build-arg CONFIG=flow.conf .
We should now have all of our docker images ready for deployment:
REPOSITORY TAG IMAGE ID CREATED SIZEgravwell SimpleRelay dafe6378899d 4 minutes ago 13.3 MBgravwell netflow 518579f9f19b 2 minutes ago 13.1 MBgravwell federator 1d1537b9399b 6 minutes ago 13.6 MBgravwell webserver_2.0 61cba91d6c44 8 minutes ago 82 MBgravwell indexer_2.0 2e844379edae 9 minutes ago 82 MB
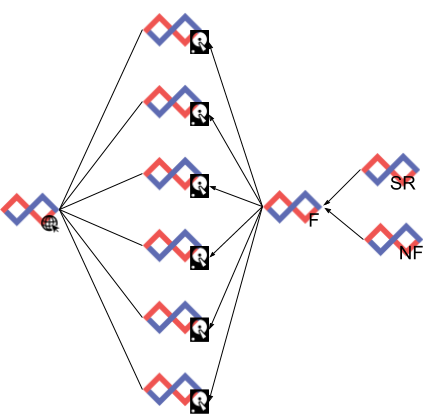
Deploying A Gravwell Cluster In 5 Commands
Now that we have images ready for each of our components, it’s time to deploy a cluster. For this test deployment we are going to be using the following:
6 Indexers
1 Webserver
1 Federator
1 Simple Relay
1 Netflow collector
We will be deploying into a user defined Docker network named gravwell. To define a new network with the appropriate address space run the docker network create command:
docker network create --subnet 172.18.0.0/16 gravwell
We must use the create our cluster in the gravwell network so that we can manually assign IPs to the containers. Docker prohibits manual IP assignment in the default network. The address assignments are as follows:
Indexers 172.18.0.100-106Webserver 172.18.0.10Federator 172.18.0.20Simple Relay 172.18.0.30Netflow Collector 172.18.0.40
The Target Tologoy
Deploying The Cluster
Deployment is relatively simple and requires issuing a single Docker command. Due to the extremely minimal configuration files used to deploy the indexer and webserver images, we need to provide some configuration parameters via docker environment variables. We can pass the configuration environment variables via the command line, or via a file. Both methods will be shown.
Deploying Indexers
For the purpose of this post we are going to deploy 6 indexers using a common indexer image. In order for our indexers to operate appropriately we need to inject two pieces of information: the Ingest-Auth and Control-Auth parameters. The Ingest-Auth parameter is used to authenticate ingesters against the indexer. Ingesters and indexers must share the same authentication token.
We will be starting our indexers with access to 2 CPUs and 4GB of memory. There are a ton of knobs to turn in Docker, but luckily the documentation is pretty good. Starting a single indexer using our gravwell:indexer_2.0 image would look like the following:
docker run -m 4096M --cpus=2 --name indexer1 --detach \ --rm --net gravwell --ip 172.18.0.100 \ -e GRAVWELL_INDEXER_UUID=$(uuid) \ -e GRAVWELL_INGEST_AUTH=SuperSecretIngest \ -e GRAVWELL_CONTROL_AUTH=SuperSecretControl \ gravwell:indexer_2.0
Argument Breakdown
Let’s break down each of the arguments in the docker run command to understand what they do:
-m 4096M
Allocate 4GB of memory to the container. The container won’t reserve the memory immediately in the same way that a full up virtual machine would, but rather we are telling Docker that this container can use up to 4GB of memory.
--cpus=2
Allow the container to use the equivalent of 2 CPU cores. This is a relatively soft estimate and the complexities of process scheduling, CPU frequency scaling, cgroups, and Hot Pocket thermodynamics are beyond the scope of this post.
--name indexer1
Name the container. If we don’t provide a container name Docker will pick one for us; Docker names can range from the uninspiring inspiring_wing to the truly epic hardcore_beaver.
--detach
Once the container starts detach from the console and run in the background. Not including --detach will keep STDIN, STDOUT, and STDERR attached allowing you to see debug messages or provide input.
--rm
Once the container exits, delete its container image and act like it never happened.
--net gravwell
Attach the container to the network gravwell that we defined earlier.
--ip 172.18.0.100
Assign the container the IP 172.18.0.100 in the gravwell network. You can only assign IPs manually if the container is being attached to a user defined network.
-e GRAVWELL_INDEXER_UUID=$(uuid)
Generate a UUID using the uuid command and pass it in via the environment variable named GRAVWELL_INDEXER_UUID. The GRAVWELL_INDEXER_UUID environment variable is used by the indexer to populate the Indexer-UUID configuration parameter if it is not set. For more info see the Gravwell documentation page on configuring environment variables.
-e GRAVWELL_INGEST_AUTH=SuperSecretIngest
Pass in an Ingest-Auth value of SuperSecretIngest.
-e GRAVWELL_CONTROL_AUTH=SuperSecretControl
Pass in the Control-Auth value of SuperSecretControl.
gravwell:indexer_2.0
Start the container using the gravwell:indexer_2.0 image we built earlier.
Firing Off All Six
Before you count the commands and start calling foul, I remember that we committed to deploying a cluster in 5 commands. We are going to get cheeky and fire off all 6 of our indexers in a single command (IT IS NOT CHEATING...it’s efficiency. Besides, how many other data analytics platforms can you deploy in a for loop?):
for i in `seq 0 5`; do docker run -m 4096M --cpus=2 --name indexer$i \ --detach --rm \ --net gravwell --ip 172.18.0.10$i \ -e GRAVWELL_INDEXER_UUID=$(uuid) \ -e GRAVWELL_INGEST_AUTH=SuperSecretIngest \ -e GRAVWELL_CONTROL_AUTH=SuperSecretControl \ gravwell:indexer_2.0done
Deploying The Web Server
The webserver requires a few more arguments, so we are going to build an environment file to pass them in. Using an environment file simplifies commands, but doesn’t really change much else. The environment file is just a list of environment variables to import into the container. The contents of our environment file will be:
GRAVWELL_WEBSERVER_UUID=bdd8ca6c-37a7-11e8-a5a1-33606972d8e5GRAVWELL_CONTROL_AUTH=SuperSecretControlGRAVWELL_REMOTE_INDEXERS=172.18.0.100:9404,172.18.0.101:9404,172.18.0.102:9404,172.18.0.103:9404,172.18.0.104:9404,172.18.0.105:9404
The command to actually kick off the webserver is:
docker run -m 4096M --cpus=2 --name webserver --rm --detach \ --net gravwell --ip 172.18.0.10 \ --env-file /tmp/web.env gravwell:webserver_2.0
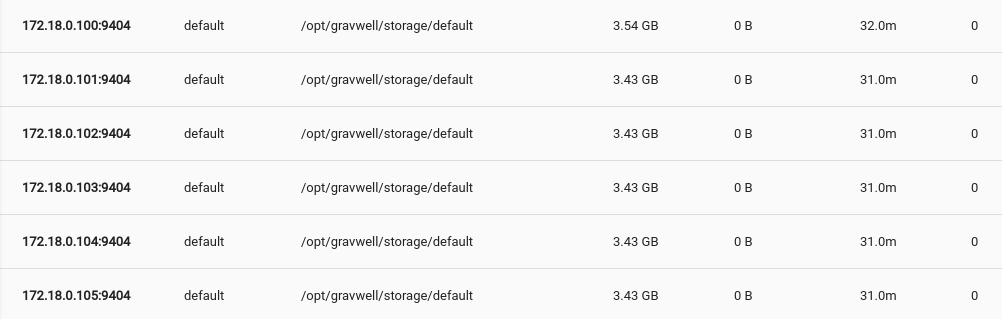
We should now have 6 indexers up with a single web server connected to them. Let’s check the status of our containers.

Everything appears up. What does the Gravwell interface have to say?
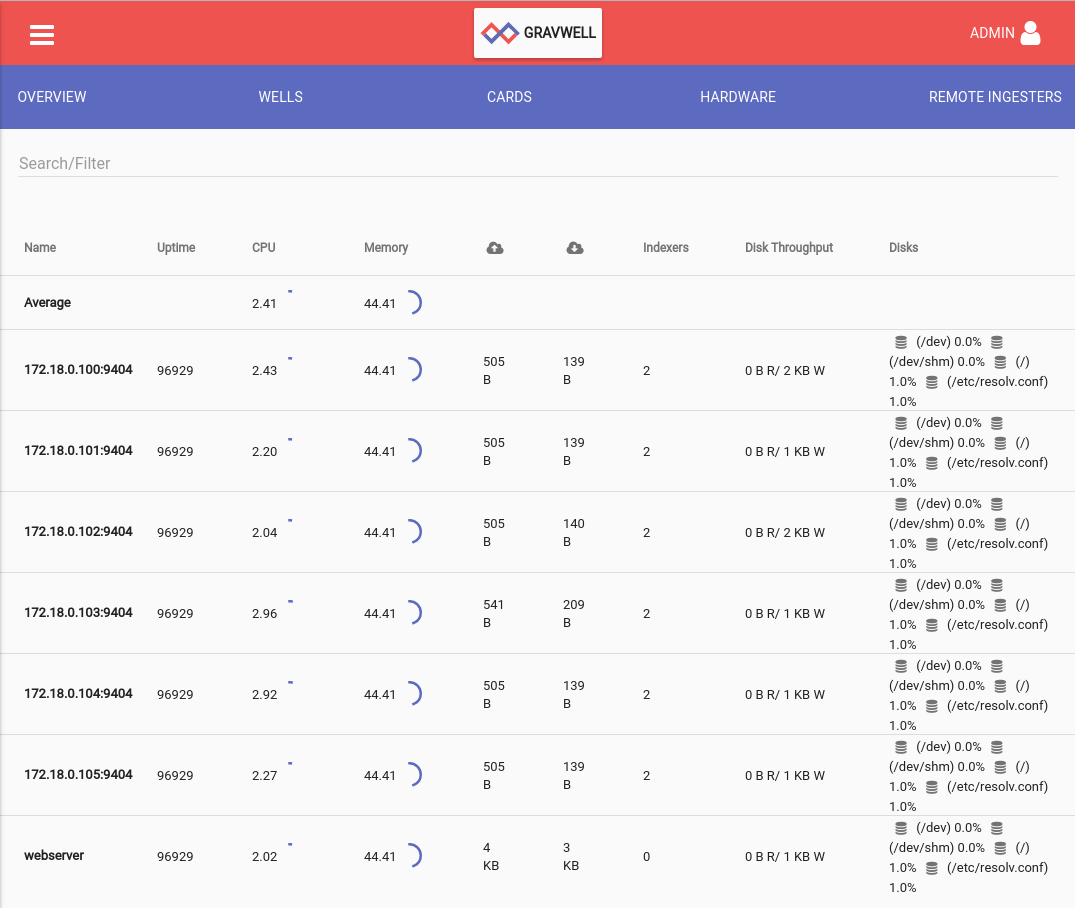
Look mom, a cluster!
Deploying the Ingesters
Every ingester is going to need the same set of ingest secrets and backend targets. So lets define an environment variable file with the following contents:
GRAVWELL_INGEST_SECRET=SuperSecretIngestGRAVWELL_CLEARTEXT_TARGETS=172.18.0.100:4023,172.18.0.101:4023,172.18.0.102:4023,172.18.0.103:4023,172.18.0.104:4023,172.18.0.105:4023
Starting The Federator Container
docker run -m 2048M --cpus=1 --name federator --detach \ --rm --net gravwell --ip 172.18.0.20 \ --env-file /tmp/ingest.env gravwell:federator
Starting The Simple Relay Container
docker run -m 2048M --cpus=1 --name simplerelay --detach \ --rm --net gravwell --ip 172.18.0.30 \ --env-file /tmp/ingest.env gravwell:SimpleRelay
Starting The Netflow Container
docker run -m 2048M --cpus=1 --name netflow --detach \ --rm --net gravwell --ip 172.18.0.40 \ --env-file /tmp/ingest.env gravwell:netflow
Checking the Remote Ingesters tab under System Stats shows that our ingesters are up and ready to go.
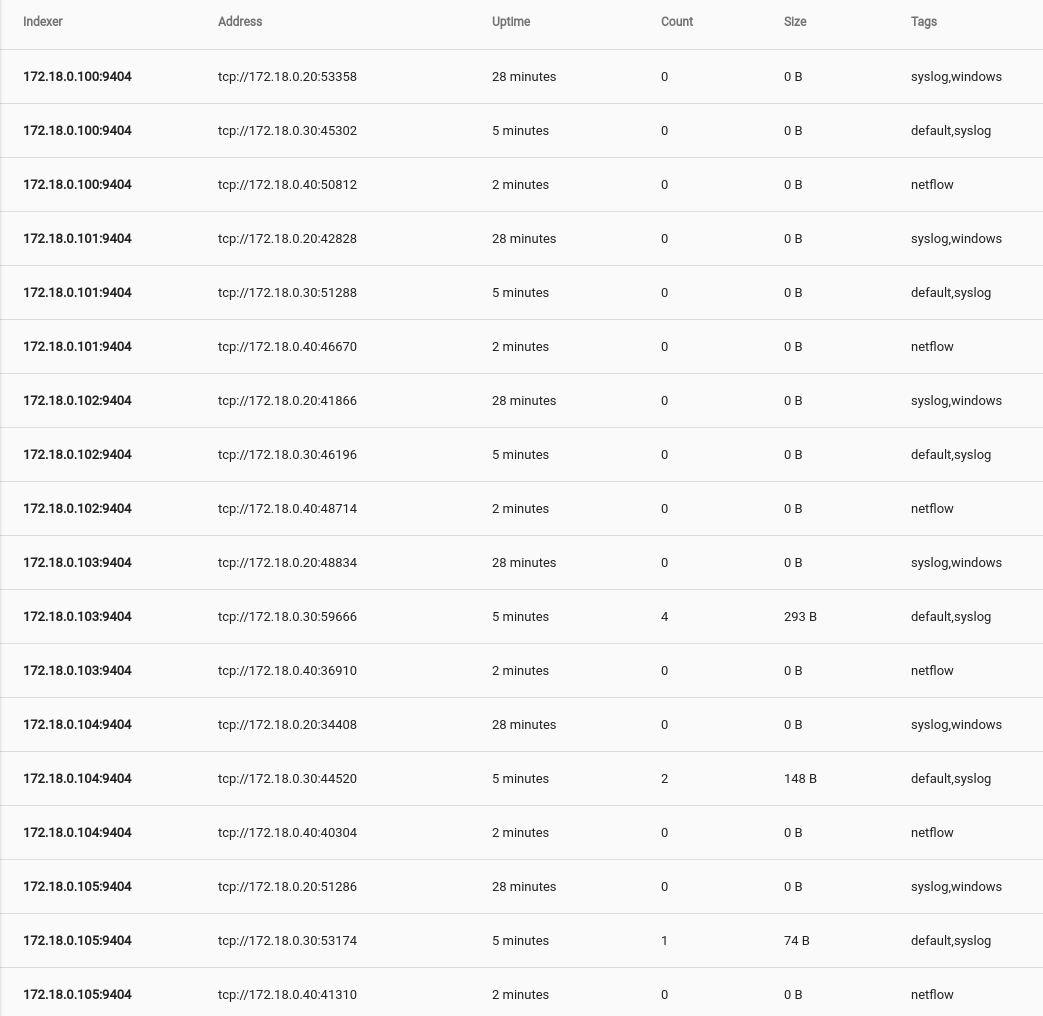
Ready. Set. Ingest!
In order to kick the tires of the newly deployed Gravwell cluster we fired up an entry generator that throws line broken log entries as fast as it can. For the purpose of this blog entry we decided to ingest Goonies quotes, the official unit of measurement is SPS (Sloth’s per second); this cluster does 4.2 million SPS.
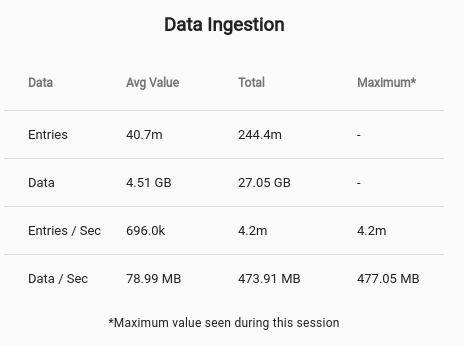
After about 30 seconds we have approximately 250 million pieces of our childhood stored in Gravwell and ready for searching. We configured the indexers with two wells. The entries coming from the ingest benchmark flow into the Default well.
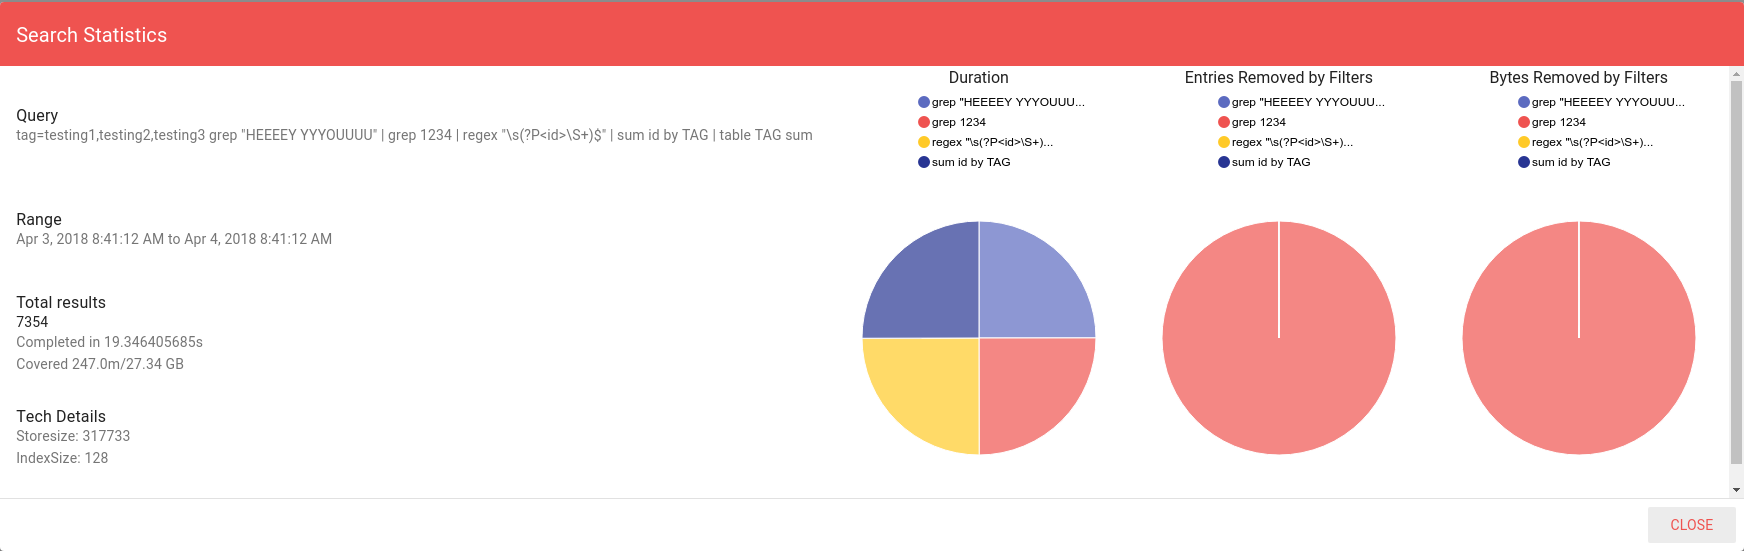
In order to test query efficiency in the cluster topology we are going to look for Sloth’s iconic quote containing a specific ID, we will extract the ID and sum its value based on which tag originated the entry. The query executed:
tag=testing1,testing2,testing3 grep "HEEEEY YYYOUUUU" | grep 1234 | regex "\s(?P<id>\S+)$" | sum id by TAG | table TAG sum
The query covered approximately 250 million entries and 27GB in about 19s. Pretty respectable for a 65W CPU that costs less than a ticket to Disneyland.
Conclusion
Gravwell set out to tackle three primary problems in the security analytics space: ingest and query speed, time to value, and data flexibility. This blog post started with an installer and made it to a multi-node distributed analytics cluster in just a few minutes. Deployment with Gravwell is a snap.
The next post in the series will examine a distributed Web Server setup that load balances and survives failures, then we will do a deep dive into the replication and age out systems that let you build a Gravwell cluster that takes a licking and keeps on ticking.
If you are ready to get Gravwell deployed in your environment and get visibility into all of your data, sign up for a free on premise trial. If you would like to play in our sandbox visit Sandbox Trial for a test account on our Drafthouse cluster. The Drafthouse cluster contains security data, netflow, pcap, Reddit discussions, Hackernews comments, and the entire Shodan firehose feed.