Overview
Today we are going to talk about something very important - beer. Homebrewing has a long tradition and many master brewers started by making swill in their basement. So today, I am going to go over my homebrew setup, how it is instrumented, how I use low-cost sensors to monitor every stage; and how a little bit of automation saved a kegerator and a few carboys.
Intro
The main purpose of this article is to jump into some physical systems monitoring and show how Gravwell can deal with all kinds of data sources in all sorts of formats (download our free Community Edition to get started on your own data monitoring & analysis). A few different data sources will be used to generate a very nice monitoring dashboard as well as an automation script to alert us when fermentation gets too hot or if we are about to freeze some beer.
The tools and techniques used here can easily be translated to other physical infrastructure systems. Gravwell makes it possible to provide an on-the-wire historical view of a control system. We will be using it to validate the performance of a fermentation and monitor a refrigeration system, but the tools, techniques, and procedures can just as easily be applied to an electrical grid, gas pipeline, or manufacturing process.
(The average reading time for this post is about 15 minutes, but there is a section about reverse engineering an opaque message structure that you can skip that will bring it down to about 7 minutes.)
The Recipe
What good is a blog about beer brewing without, you know, beer. As we work through the technical details of our monitoring system we are going to track a homebrew beer from birth to death. Our candidate is going to be a partial mash Falconer's Flight IPA. Now, I am from the west, so you may be expecting me to talk crazy about 80+ IBUs and hops so strong that you can track my movements by smell. This isn't that kind of IPA, but it IS weird.
Fermentables
- 7lbs of toasted millet (Mashed for 4 hours with a TON of enzymes)
- 3.3 lbs of Briess White Sorghum Extract (Added at start of boil)
- 1 lb of brown rice syrup (get that ABV up a bit)
- 1 lb of Idaho wildflower honey (Adds some more sugar and complexity)
Hop Schedule
- 1 oz 7C-Falconers Flight at 60 minutes
- 1 oz 7C-Falconers Flight at 30 minutes
- 1 oz 7C-Falconers Flight at 15 minutes
- 1 oz SIMCOE at 15 days in secondary
Yeast
- Safale US-05 re-hydrated and prepped in a 48 hour starter
Wait, What?
You may have noticed that the fermentables are not exactly typical - that is because this is a gluten free beer. Look, I like beer, and I'll be damned if I am going to let a little genetic tomfoolery get in between me and a proper IPA.

Thanks mom! Thanks dad!
Data Collection Points
Unfortunately I don't have the equipment to monitor my mash or actual boil, so the pre-birth phase of this beer lives in the shadows. However, I hope to get a few of these bad boys soon. This will let me get very accurate continuous gravity readings from WITHIN the fermenter.
Fermentation Chamber
My homebrew setup is rudimentary compared to a commercial brewery or industrial process. We will be monitoring 5 data points that directly interact with "the process" (my homebrew) as well as 2 external data points that may or may not influence it (the weather). Large-scale industrial processes often have thousands of points, so while my dataflows are minimal, rest assured that Gravwell will handily scale up to 10s or hundreds of MBs per second; just add indexers.
We are going to monitor the humidity of the fermentation chamber to make sure that I don't build up too much moisture, as mold is bad and my chamber is pretty closed off. The humidity sensor in use is the DHT22 (https://www.adafruit.com/product/385) humidity sensor. This sensor has a 2-5% error rate and a poll latency in excess of 2000ms, but if the humidity changes that fast then I have many more pressing concerns.
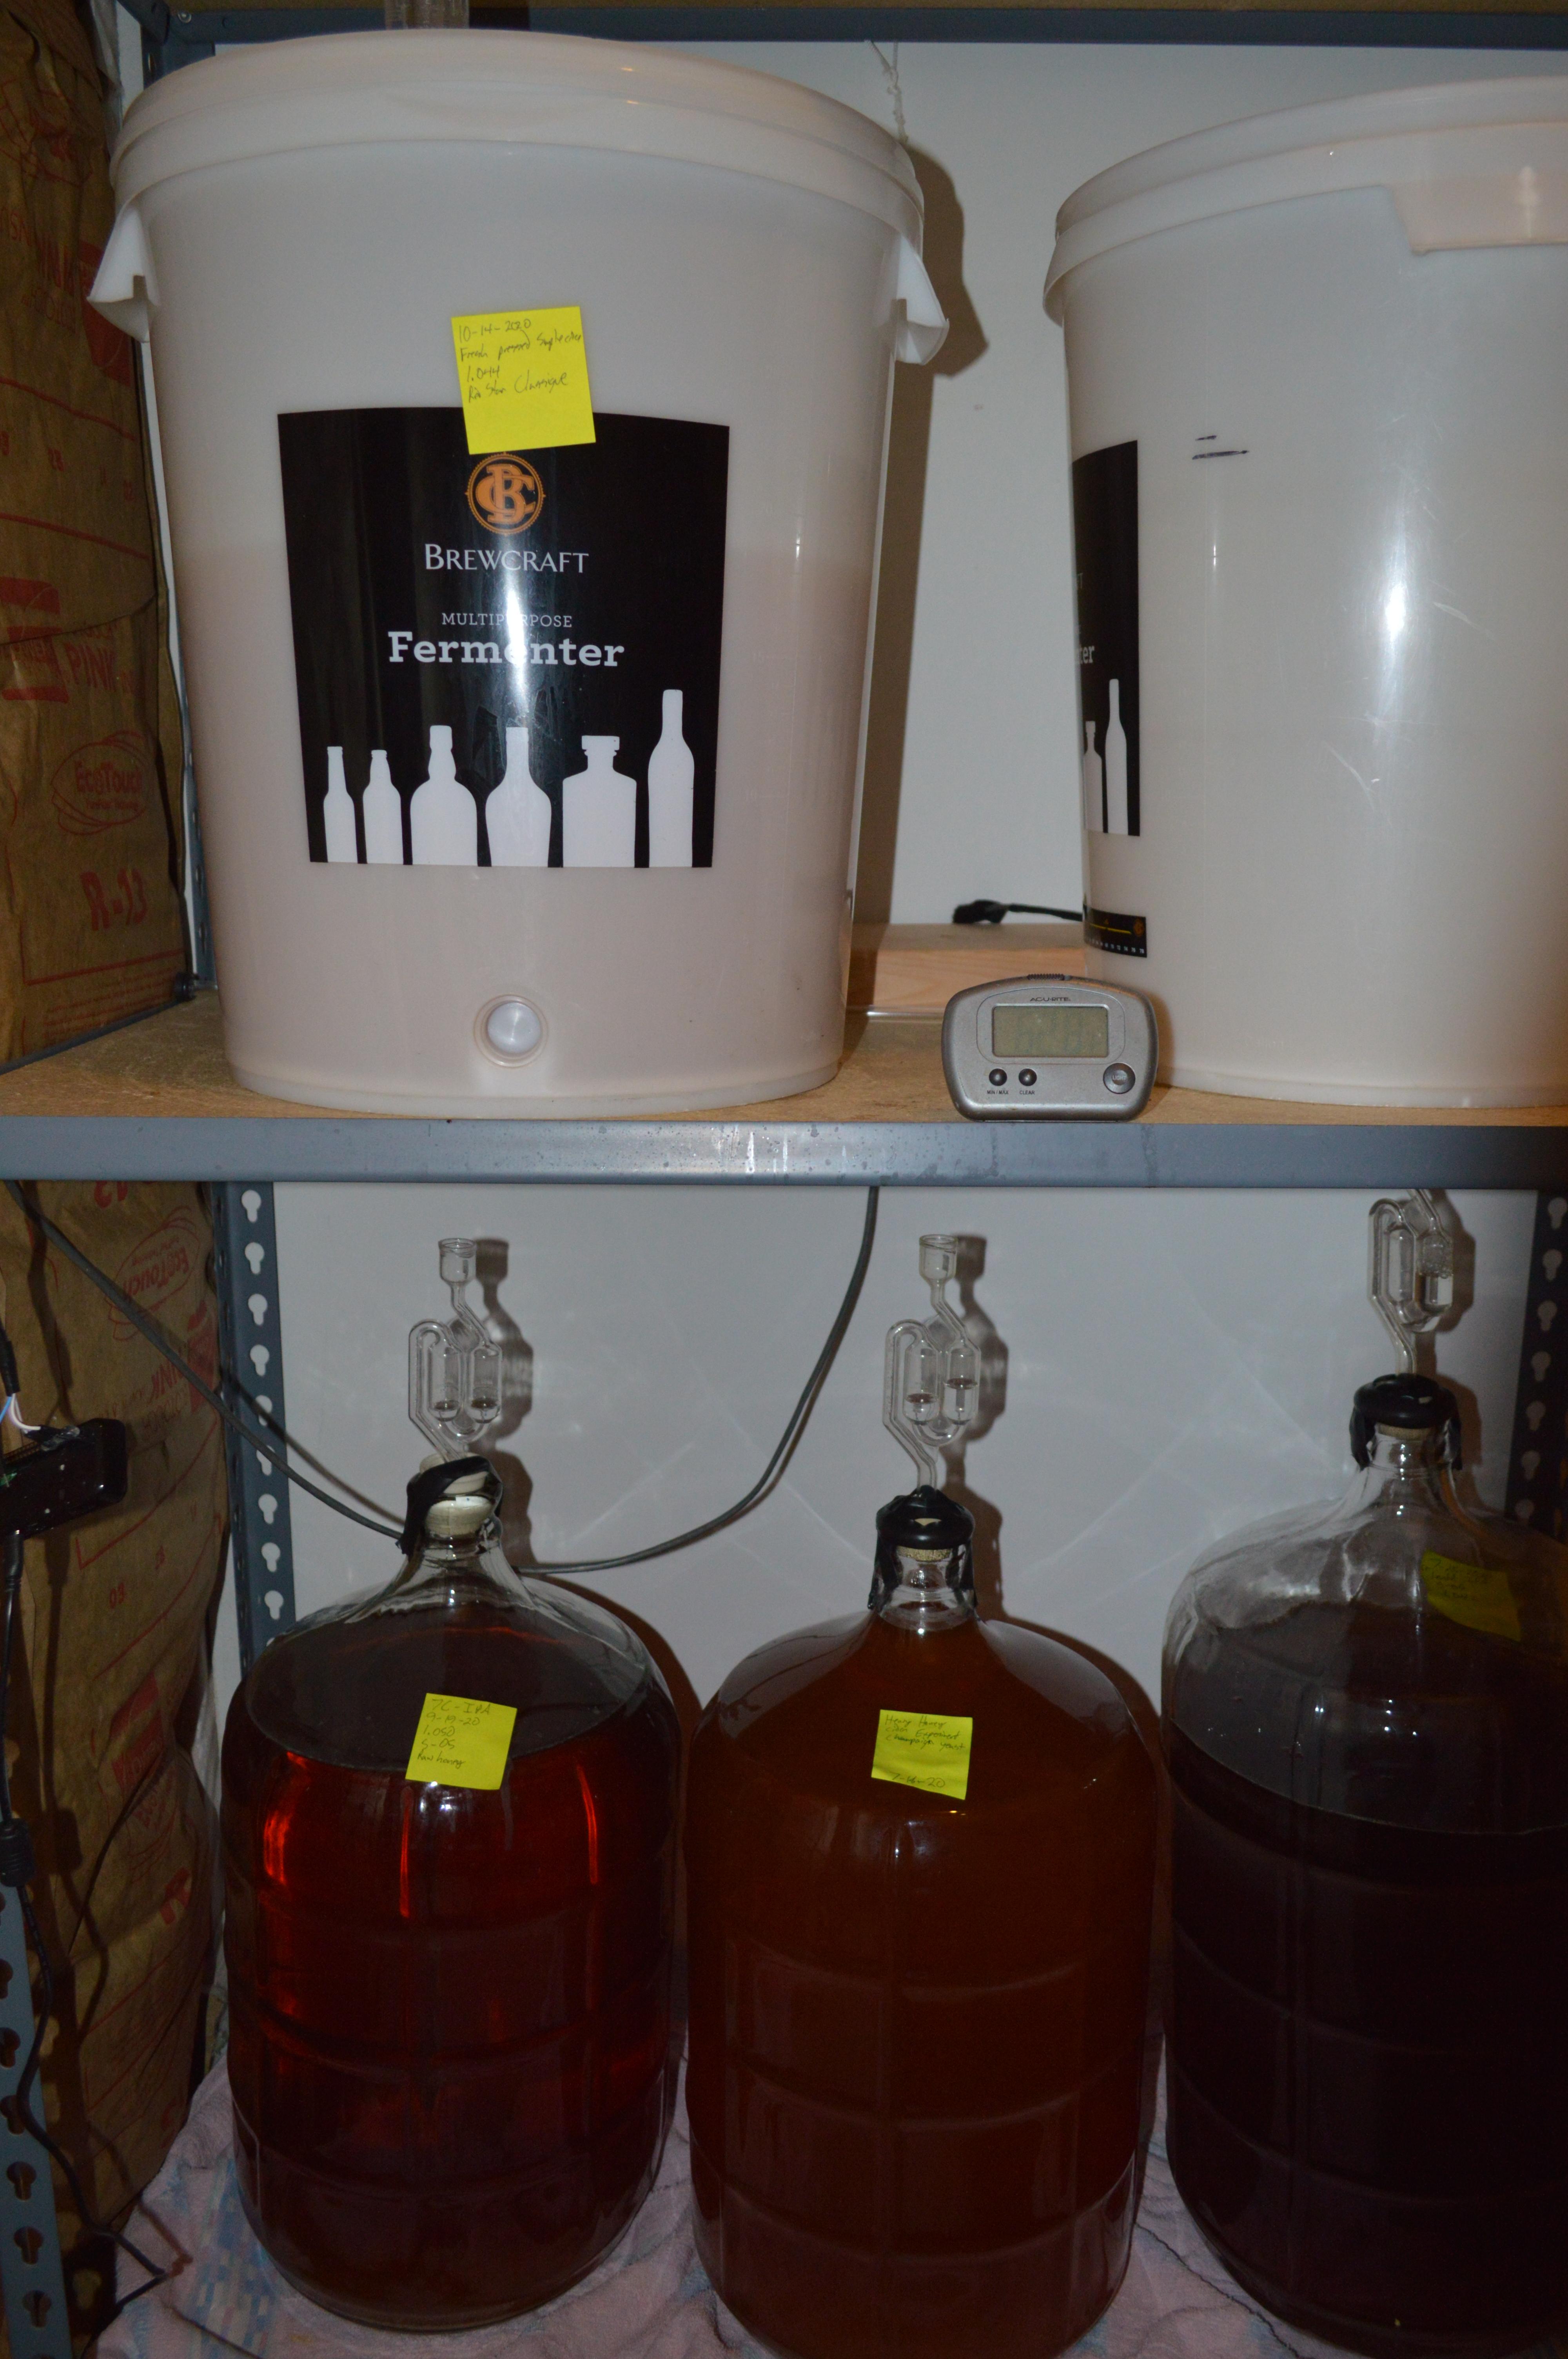
The DHT22 module also contains a temperature sensor, which I had assumed was too inaccurate for our purposes. I decided on a sealed DS18B20 probe that is resistant to moisture and good for about +/-0.5 degrees Celsius resolution and a polling interval of about 750ms. This probe will be in charge of monitoring the ambient temperatures for primary and secondary fermentation. After getting a good look at the output of temperature readings from both the DHT22 and DS18B20 I felt pretty comfortable with the DHT22, so the DS18B20 is just a backup.
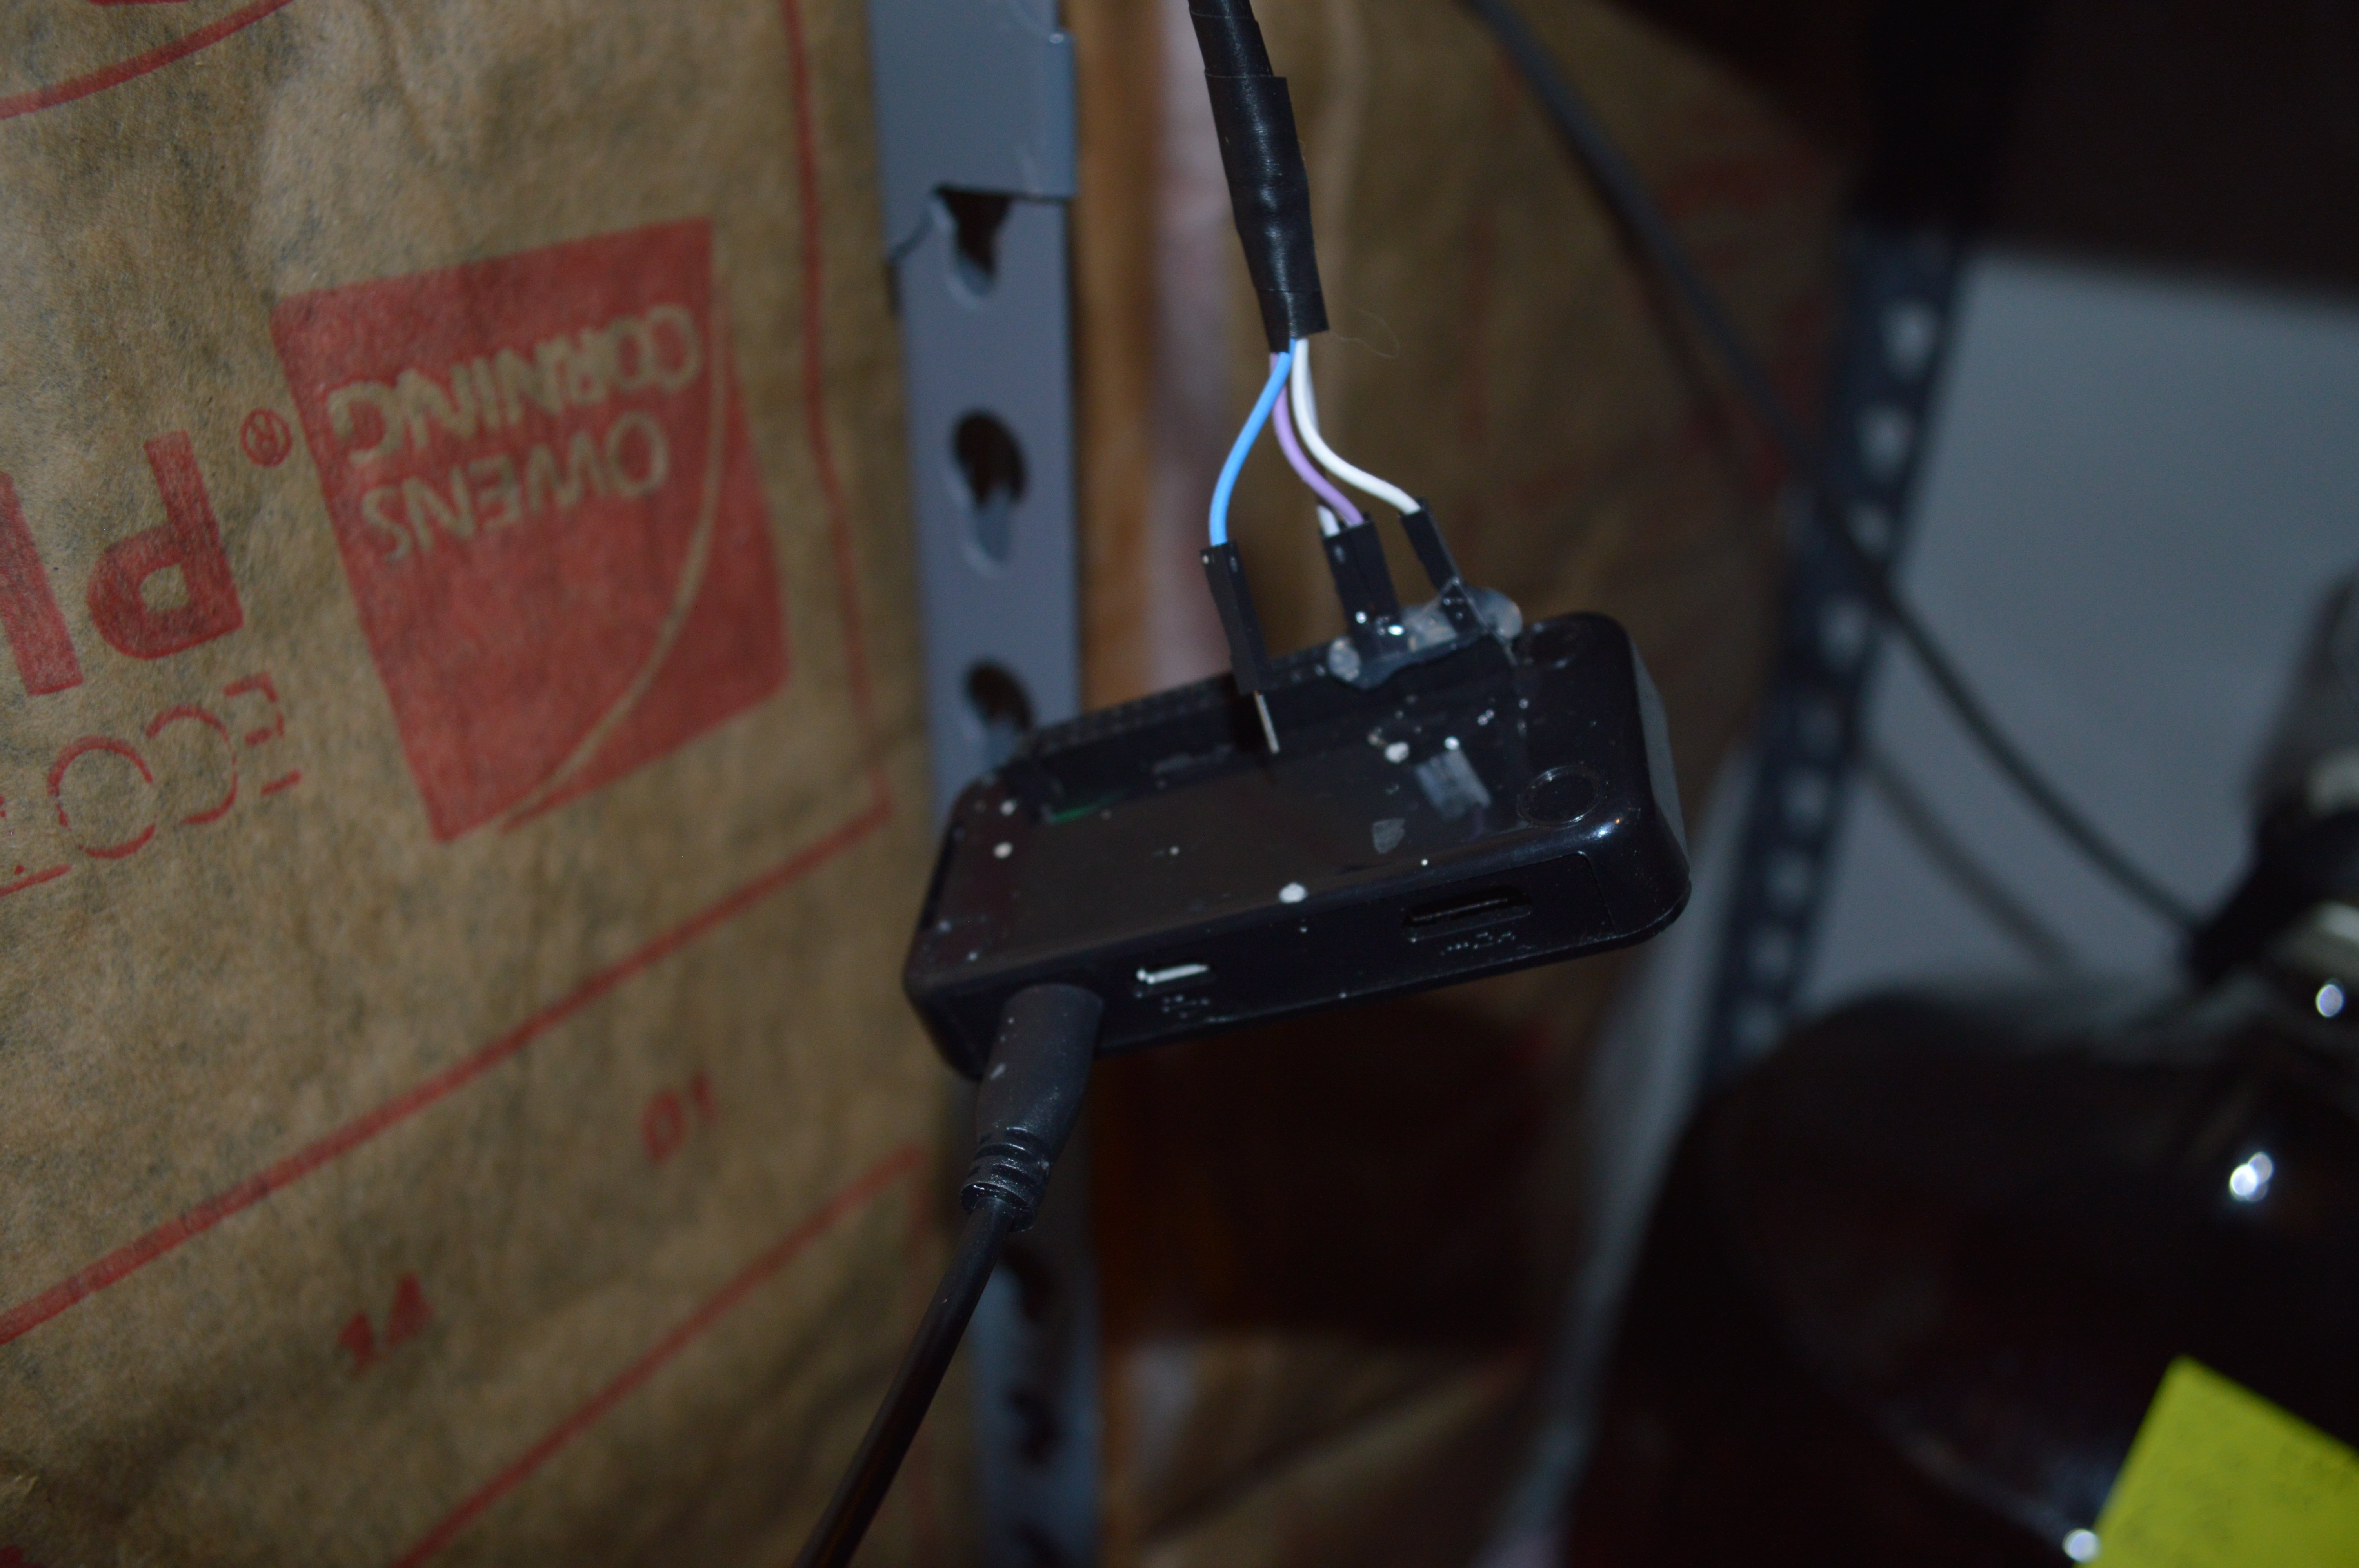
Both sensors are tied to a Pi Zero SBC with a simple python application that polls each sensor and performs an HTTP post at regular intervals. It's pretty straightforward:
#!/usr/bin/python
import Adafruit_DHT as dht
from datetime import datetime
import time
import requests

url = 'http://10.10.10.1:8888/fermenter'
while True:
    start_time = time.time()
    try:
        h,t = dht.read_retry(dht.DHT22, 4)
        tstr = datetime.utcnow().strftime("%Y-%m-%dT%H:%M:%S.%fZ")
        data = '{2:s} Temp={0:0.2f}C  Humidity={1:0.2f}%'.format(t, h, tstr)
        requests.post(url, data=data)
    except Exception as e:
        print "Failed pull and post", e
        time.sleep(1)
        continue
    elapsed = time.time()-start_time
    #print elapsed, data
    if elapsed < 60.0:
        time.sleep(60.0-elapsed)
Capturing the Fermenter Temperature and Humidity Data
Capturing the fermentation chamber data is pretty simple. We just stand up the Gravwell HTTP ingester and setup a listener on the /fermenter route. Each HTTP post sent over by our python script will be captured and ingested as an entry. The configuration is extremely simple:
[Listener "beer"]
     URL="/fermenter"
     Tag-Name=fermenter
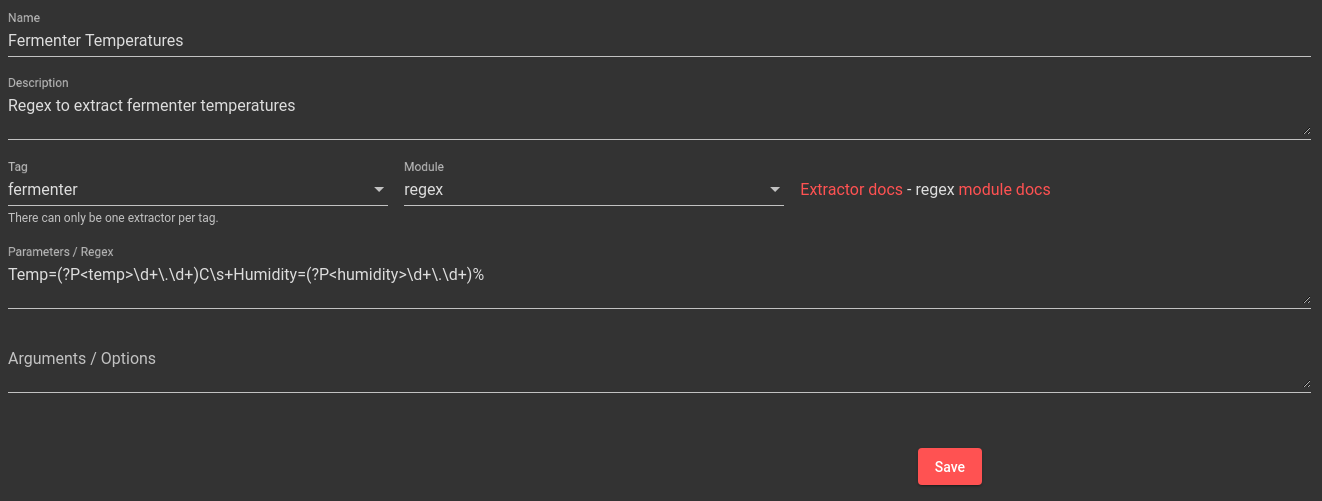
The data format in our python script is designed more for human readability but it is easily extracted and processed using a regular expression. Regular expressions are hard and ugly, so I am going to build a regex so that I only have to do it once.
With our AX in place it's pretty easy to get a view of our fermentation chamber temperature and humidity:
tag=fermenter ax |
    stats mean(temp) as temp mean(humidity) as humidity |
    chart temp humidity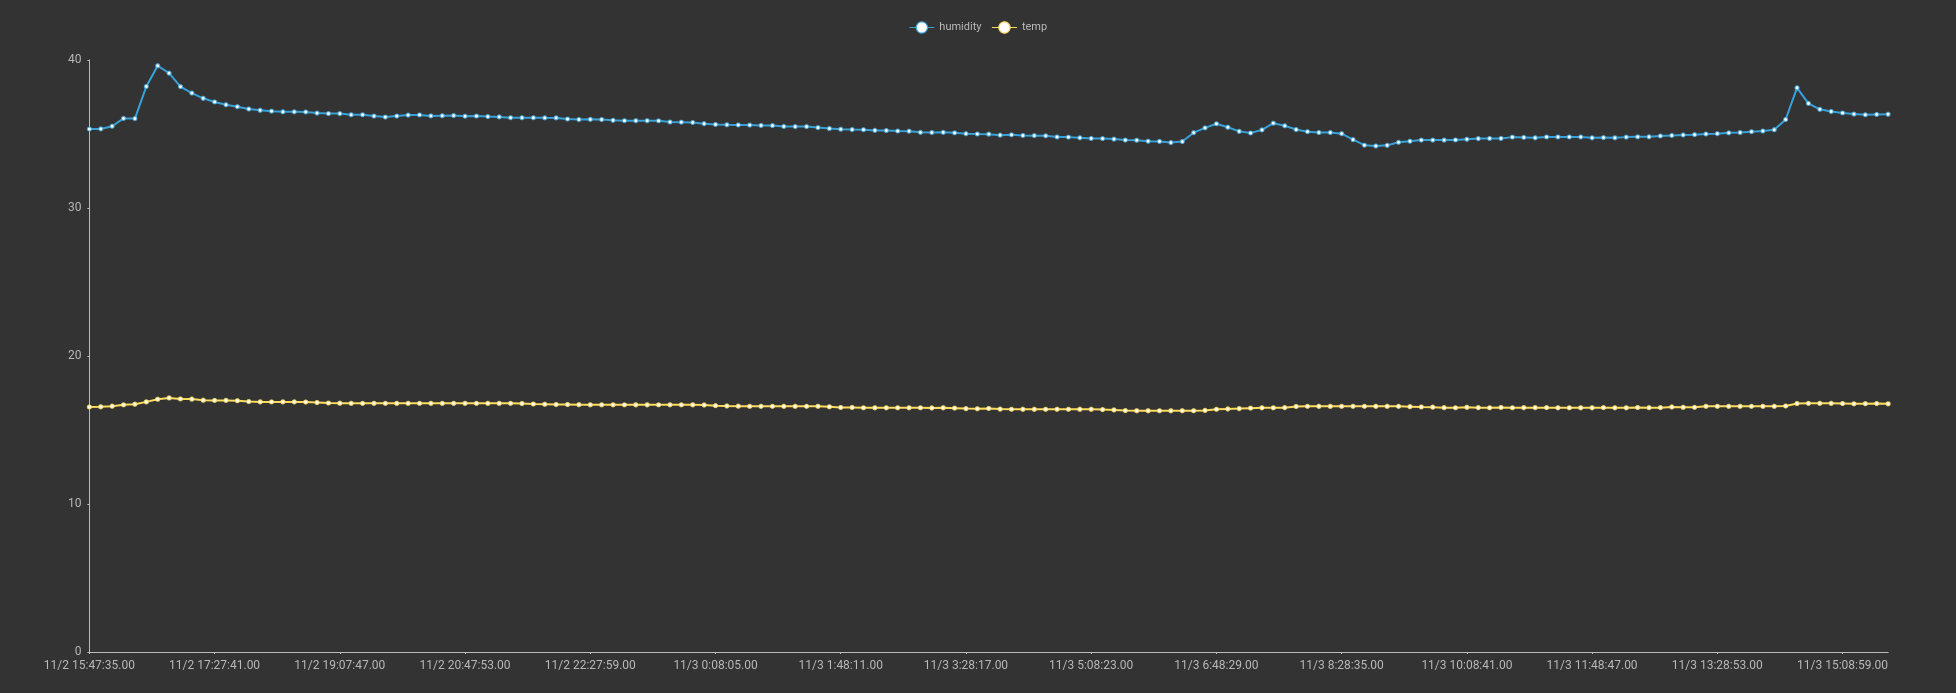
We can see two very nice stable lines representing the temperature and humidity of the fermentation chamber
Lagering and "Distribution"
The fermentation phase of brewing is arguable 80% of the process, but I am anal. I want a record of birth to death, and that means a well-instrumented kegerator. My kegerator is an older chest freezer with a thermostat that can go from just under 30 degrees Fahrenheit to -10 degrees Fahrenheit (that's -1.1C to -23.3C for those of you with reasonable units of measurement). That temperature range is far far too cold for beer, and the thermostat on the freezer isn't exactly stable. I decided to grab something that would control the compressor as well as provide some data output. This requires a few temperature probes, a switch capable of handling 120V AC at 10 amps, and some form of data output.
 Completely unnecessary vanity shot of a kegerator
I hit up eBay and bought the cheapest thing I could find. It was an unmarked black box that contained some sort of MIPS processor, two temperature probes, and a very large contactor that sits directly in line with an AC input and output. An exposed serial port is available for configuration (with pretty much no documentation).
After finagling with the serial port, I was able to get the device up on my network and reporting data via encoded messages thrown in UDP packets. The temperature probe messages appear to contain a sensor ID, some "stuff", and the sensor name. The ASCII string in each message is the name assigned to each temperature probe, and I am able to control the cycle time (update interval).
I have no idea who makes this thing but it appears to control the compressor well, keeping my kegerator in a pretty tight temperature range and the data output appears to have "stuff". At a bare minimum there are two recognizable data sets with a constant 16bit value up front that should let me at least tag them differently.
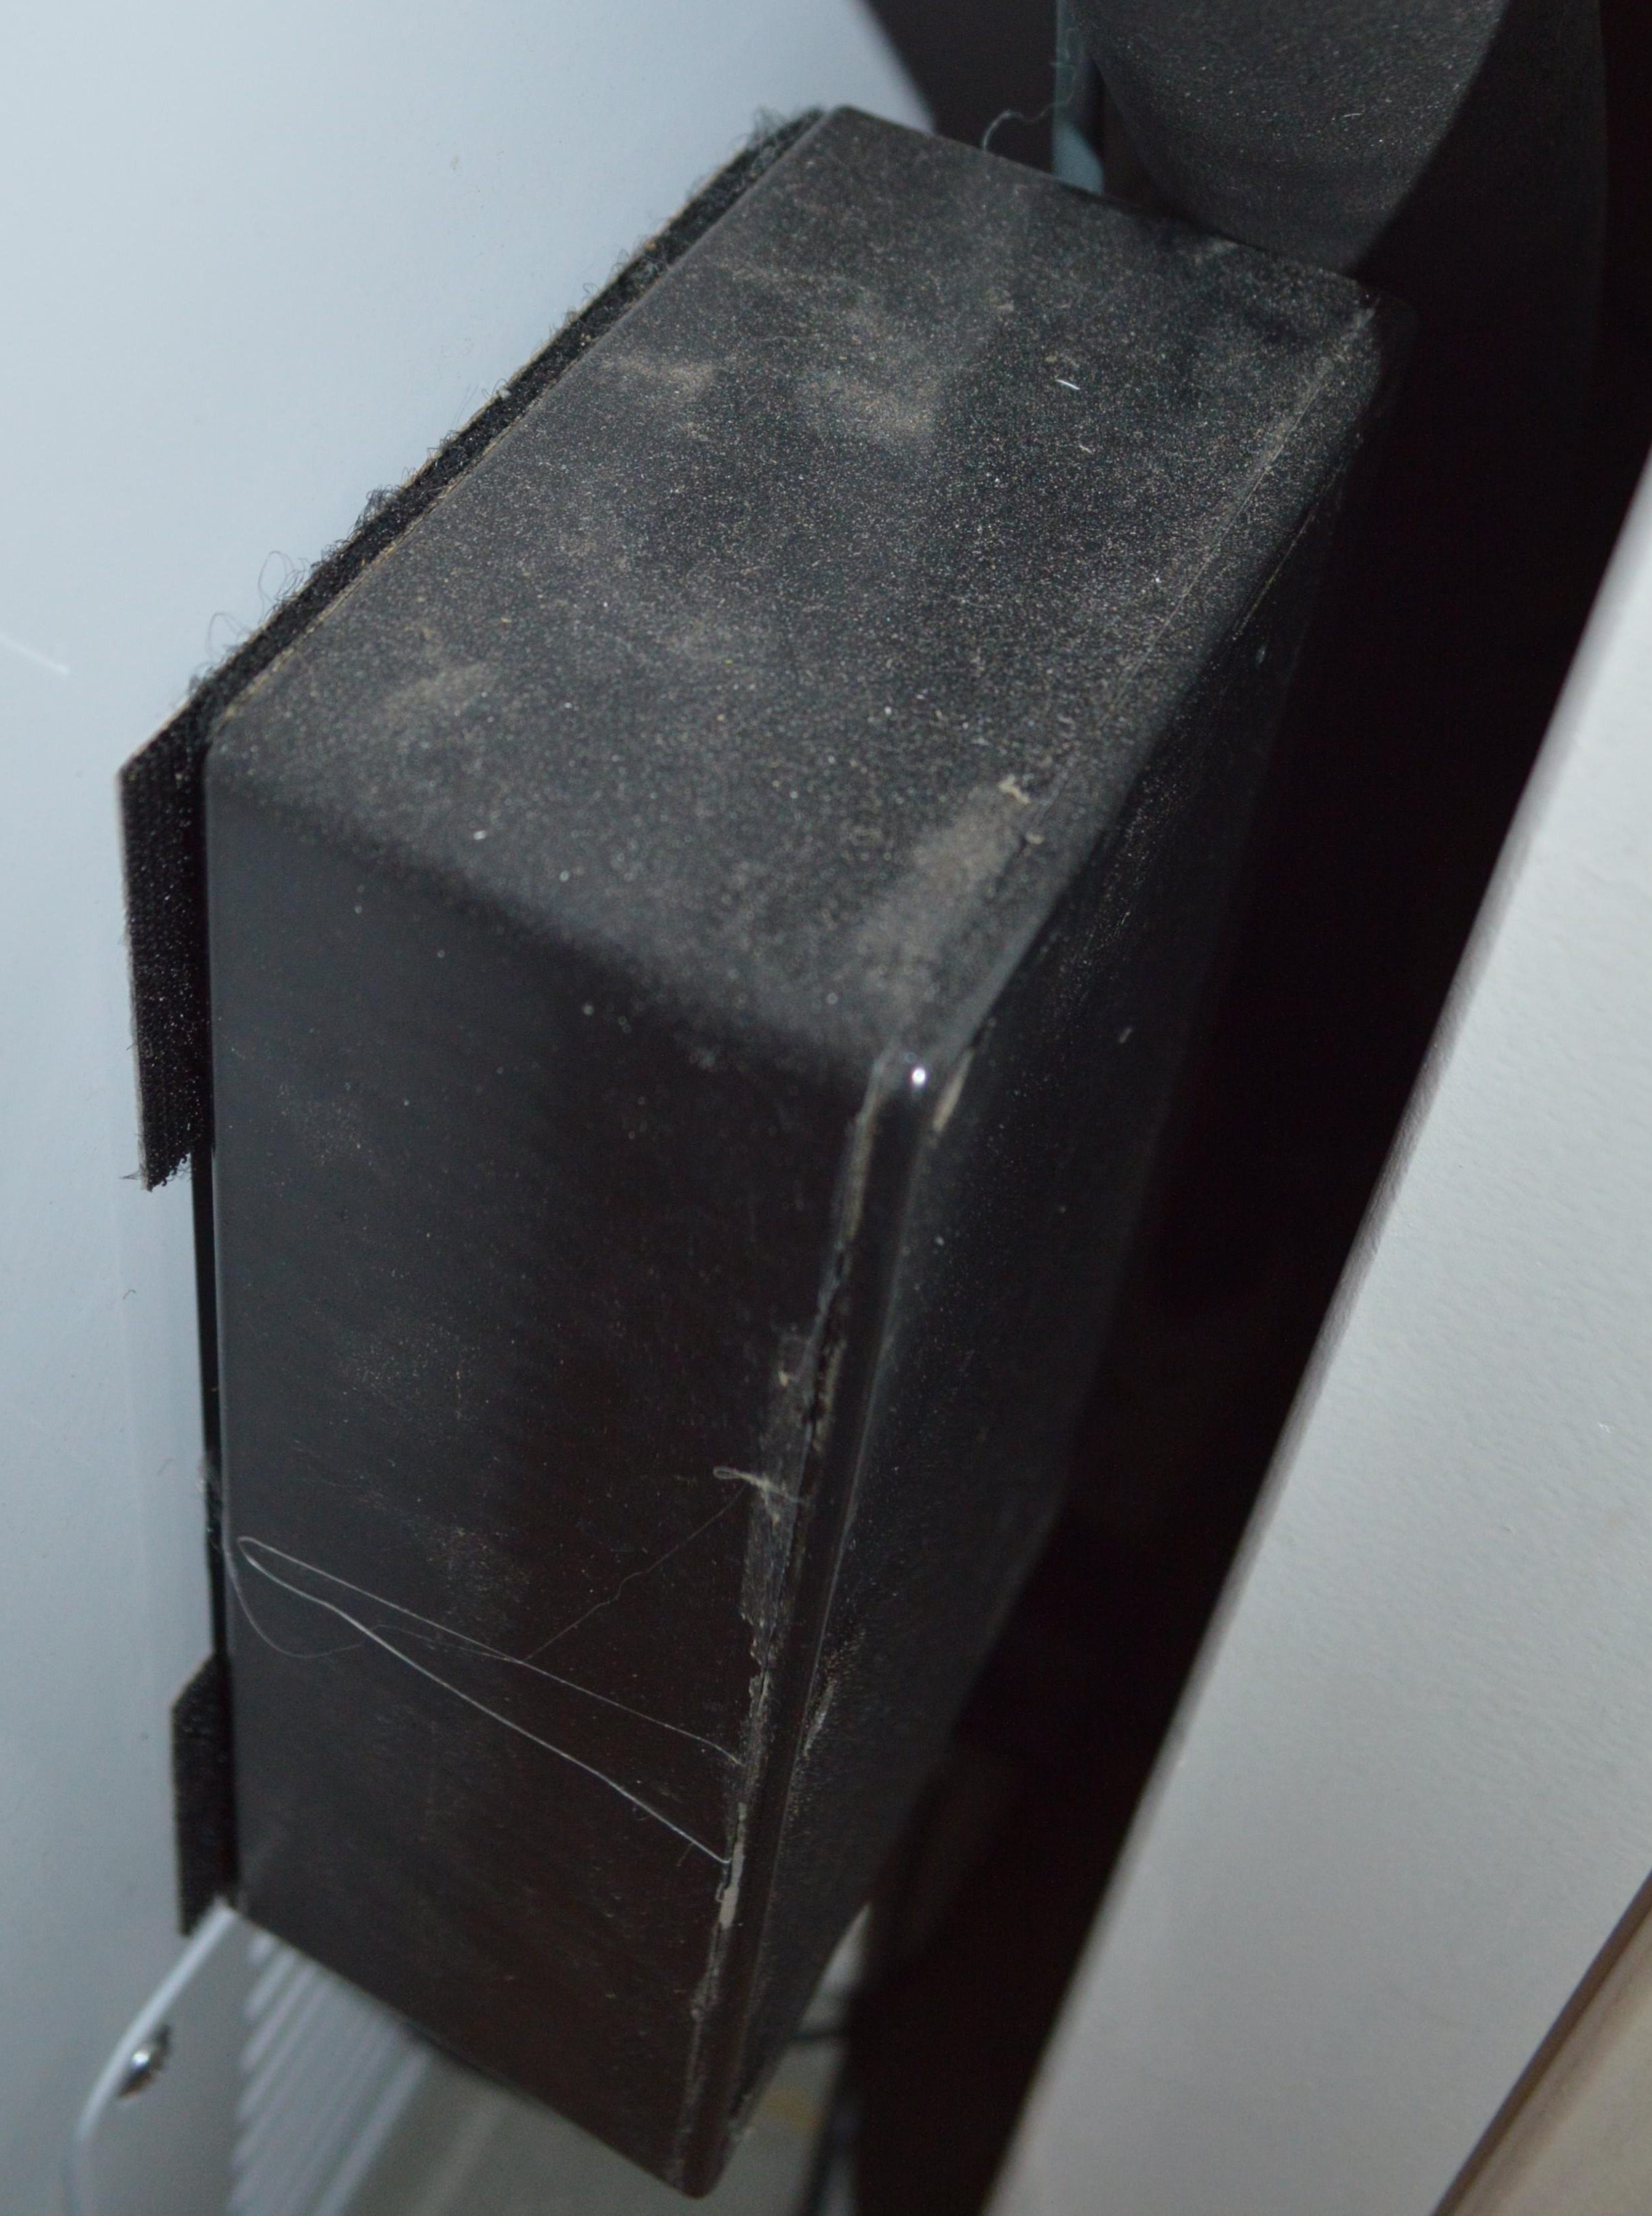
The "box" crudely attached to the kegerator. Notice the glue leaking out...
Capturing the Kegerator Data
I used some netcat fu to get a first look at the UDP packets coming off our kegerator controller; this let me verify packet intervals and get a rough look at size. Once I identified the constant value that appears to represent some sort of data type, it was time to write a quick and dirty ingester to capture each message. The Gravwell ingest framework is open source under the BSD 2-Clause license, so we can just whip up a little Go and relay these messages as-is into a Gravwell instance. Check out the source for the ingester on a Github gist.
Once I had data flowing it was time to make sense of it. Both data packets were clearly some sort of binary packed structure, so step one was to fire up the hexlify module and see if we could decipher it. The first query is simply tag=keg hexlify
I could see some pretty well-defined structure with what looked like some integer values (the nicely aligned leading zeros is a dead giveaway). I could also see the ASCII name I applied to each sensor at the tail end of each message. We can break them out using the slice module:
tag=keg slice uint16([0:2]) as id string([22:]) as name [2:22] as stuff |
hexlify stuff |
table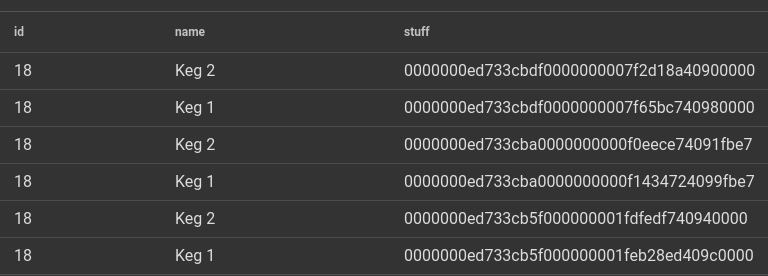
Looking at the demarcation in the unknown "stuff" piece, it looks like there are two 64 bit values and a 32 bit value. Based on the leading zeros and the fact that this is likely a MIPS CPU, I am going to guess they are big endian encoded, so let's grab those too:
tag=keg slice uint16([0:2]) as id string([22:]) as name [18:22] as stuff
              uint64be([2:10]) as a uint64be([10:18]) as b |
hexlify stuff |
table TIMESTAMP a b name stuff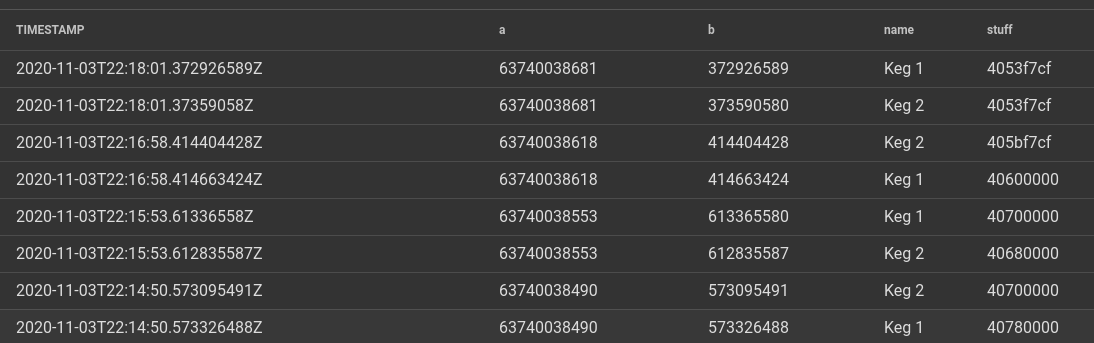
We can see that the value "a" (random variable name that I inserted) appears to increase with each message, but when I tried to correlate it to time it really didn't make much sense. It was loosely correlated to a timestamp but would then jump wildly. When I was setting up the little box it had the option to point at an NTP server (which I enabled). The "b" variable however appears to correlate pretty well with a microsecond. I am guessing the two "a" and "b" fields are some encoding of a timestamp (found out later that this is the number of seconds starting from 0000-00-00 UTC). The last field doesn't make sense as any sort of integer, but I did verify that when I grabbed one of the temperature sensors it would change dramatically. Knowing that this is tied to a temperature SOMEHOW, I just started throwing 32bit types at it. Turns out it's a big endian encoded 32 bit float.
tag=keg slice uint16([0:2]) as id string([22:]) as name
              float32be([18:22]) as temp |
table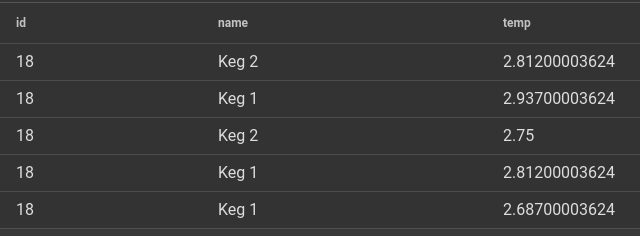
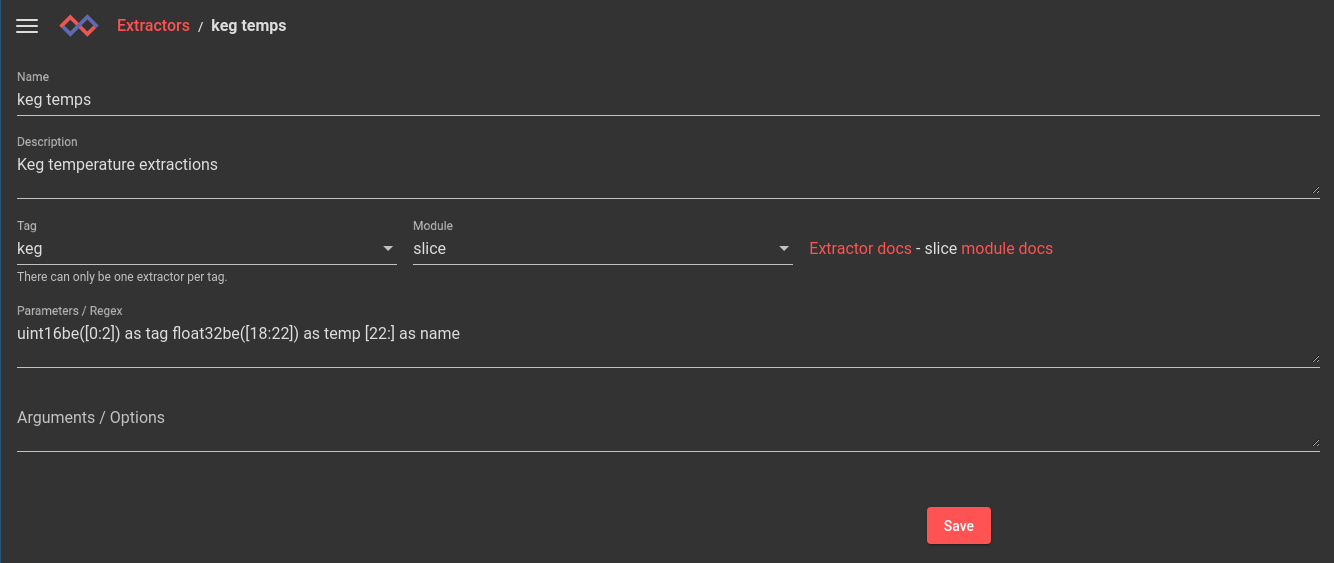
With the message decoding in hand, I popped over to the extractor tab and whipped up an autoextractor so I don't have to remember byte offsets, types or anything of that sort:
For the final validation - a chart of temperature values for each keg:
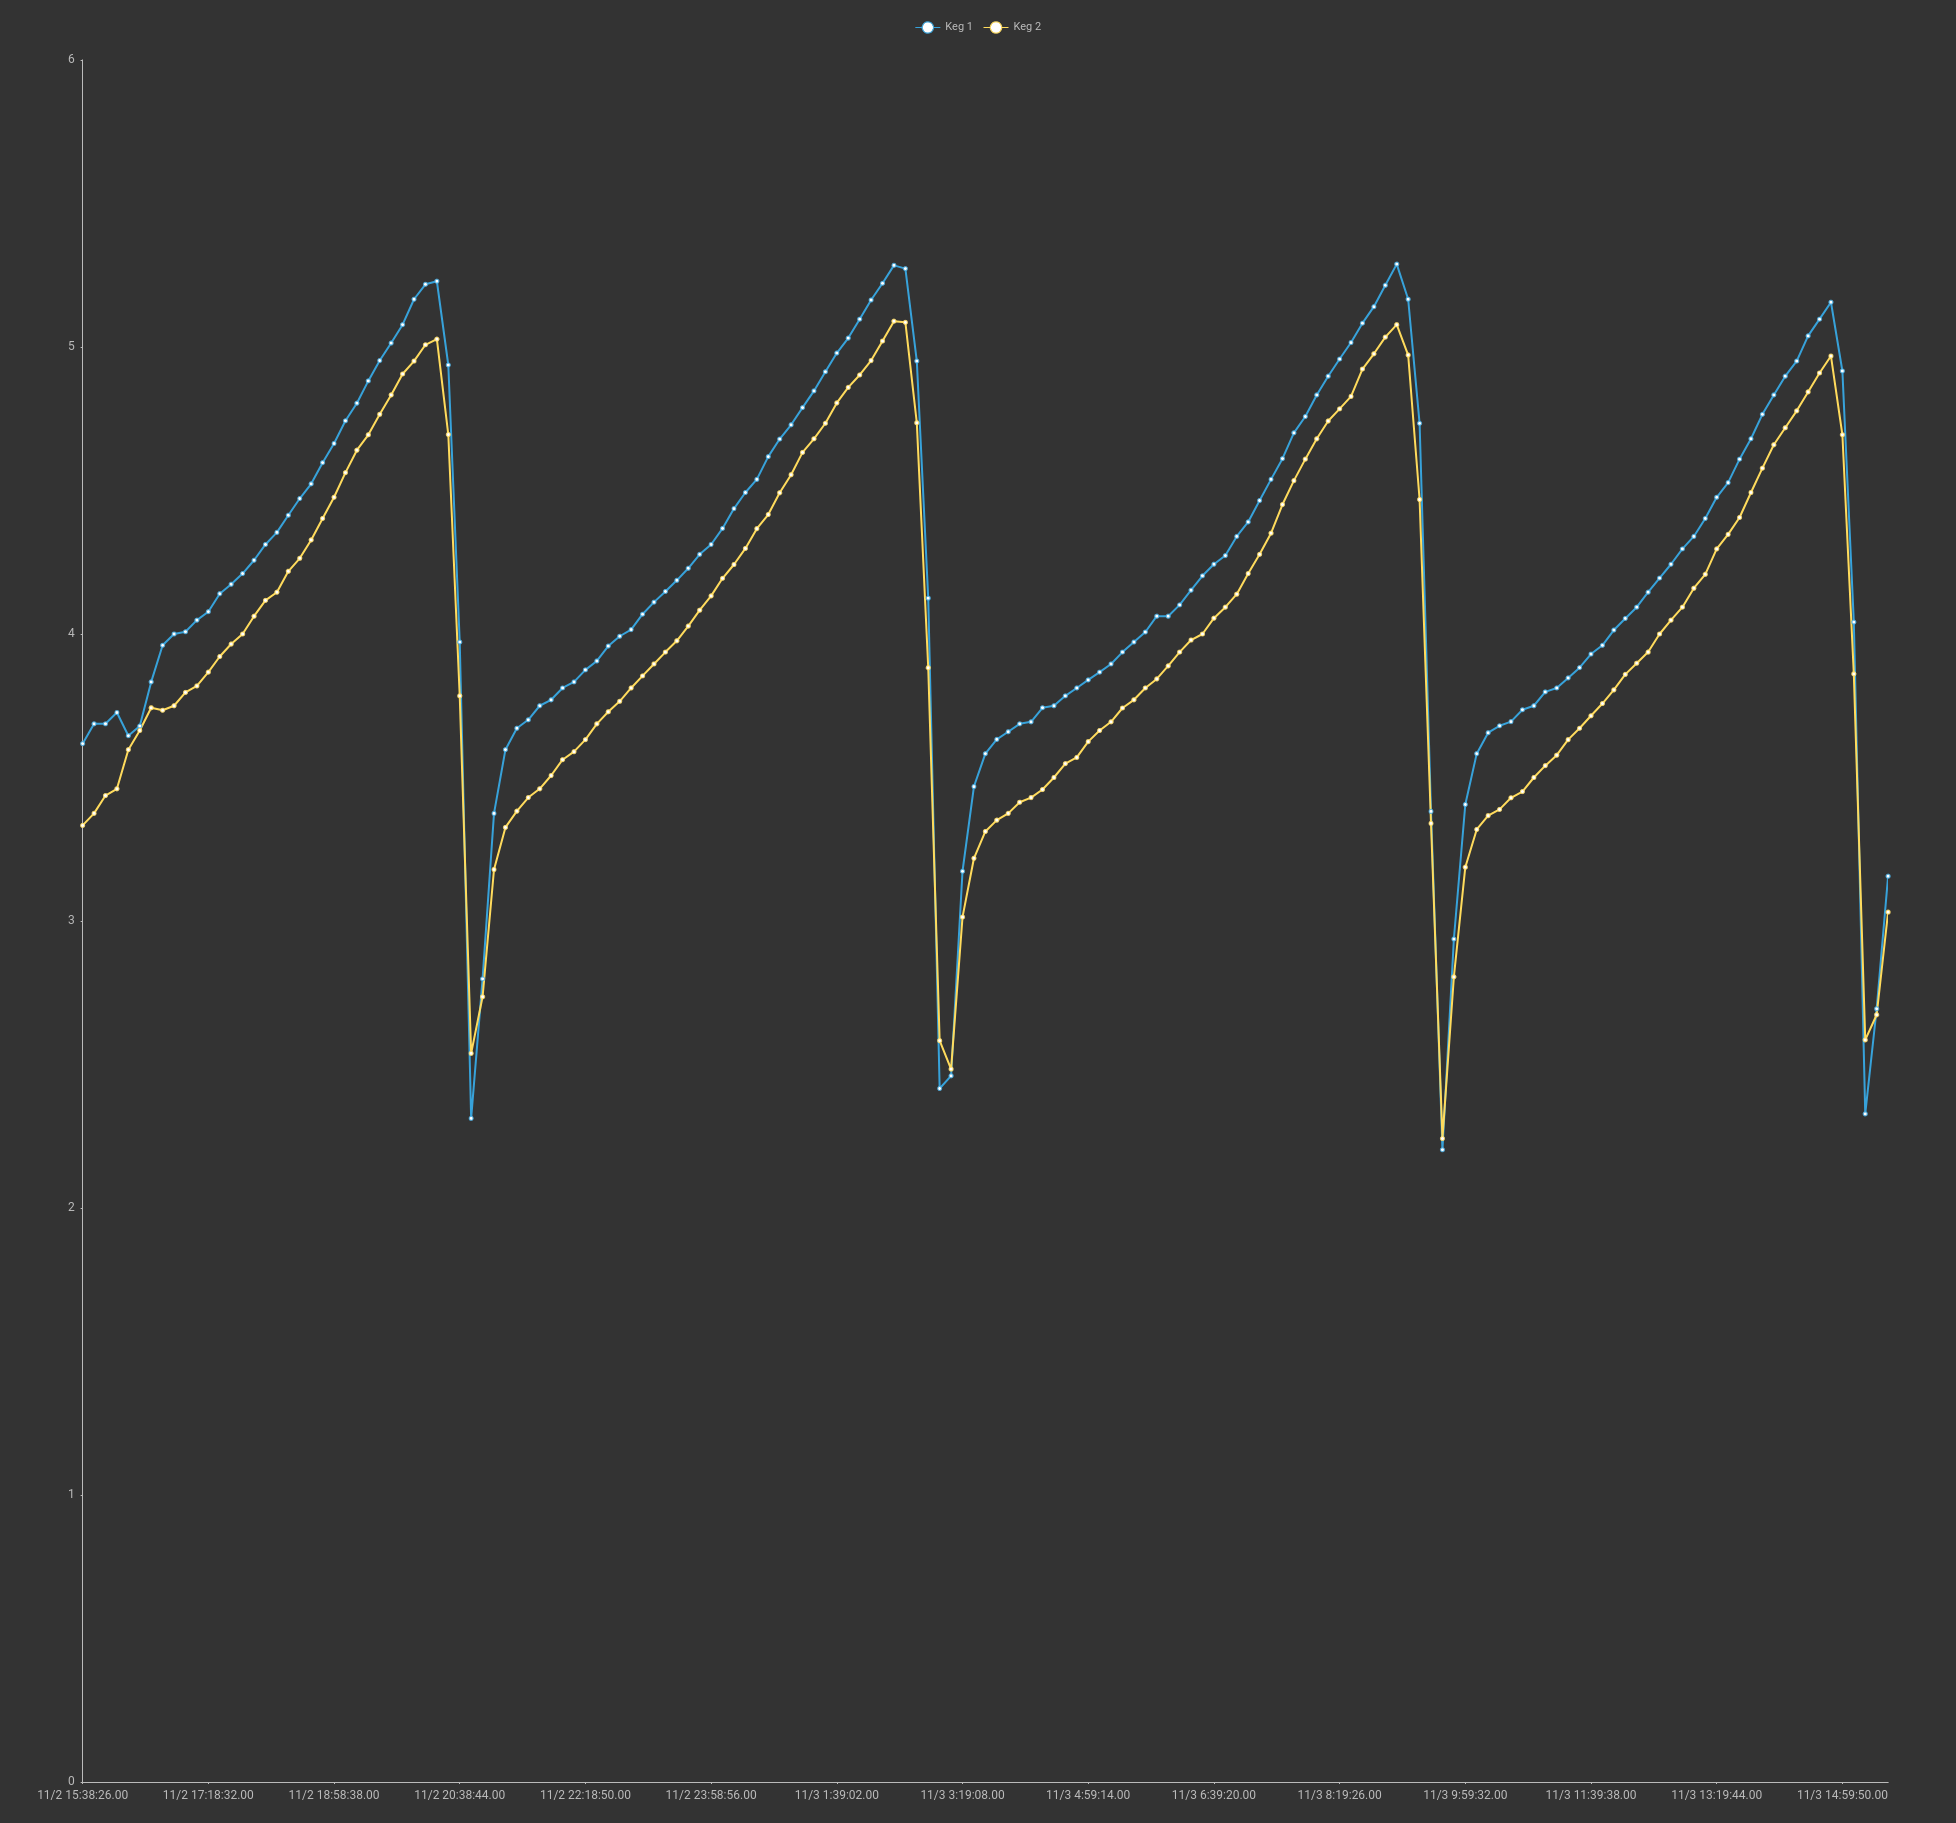
We can see a nice clean temperature gradient chart that is exactly what I would expect in a temperature vessel. The temperatures slowly creep up with a sharp downturn when the compressor kicks on. Overall it looks like our temperature is bouncing between 2.2 and 5.2 degrees C, which is a little more variance than I would like, but to be honest I have no idea how to tune it and it's within reason on my target temperature of 4 degrees C.
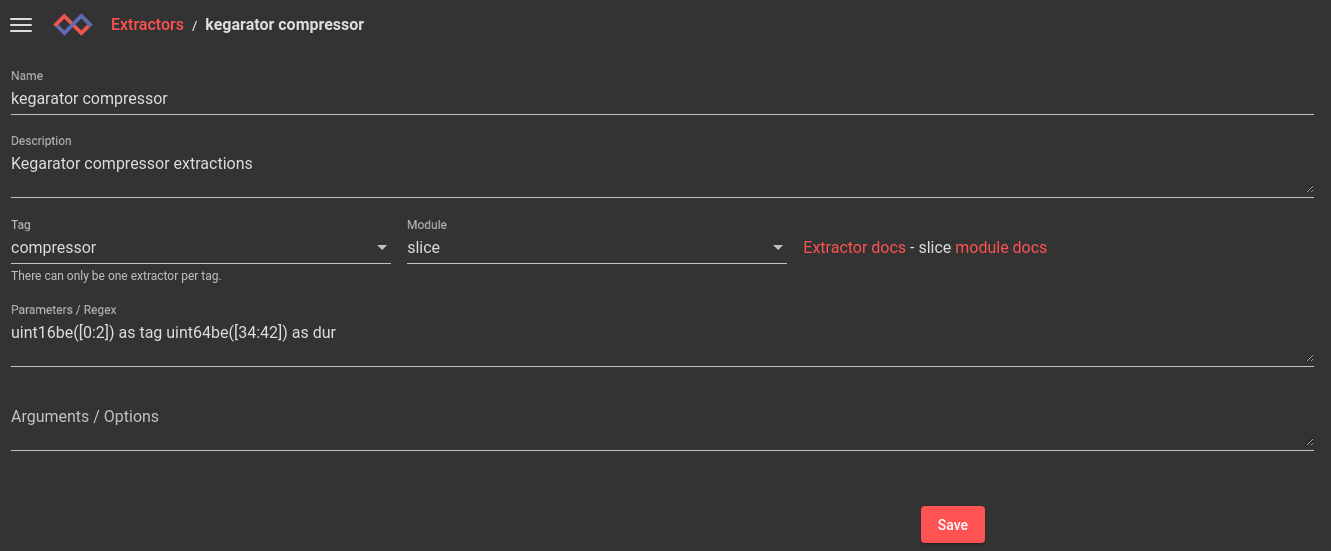
I'll save you the details, but I was able to repeat this process on the other data type that represented the compressor and get an AX built for that tag too:
Queries and Data
Now that we have decoded data for fermentation and lagering/distribution, let's get that weather data flowing. Now, I COULD go buy a weather station, rig it up, figure out a way to get data flowing, decode the data, build an AX, etc. Or, I would just bounce over to the kits interface and install the weather kit.
This kit lets me plug in my location and I get weather data flowing, and all I need is an Open Weather Map API key (free). Three clicks later and I have this bad boy:

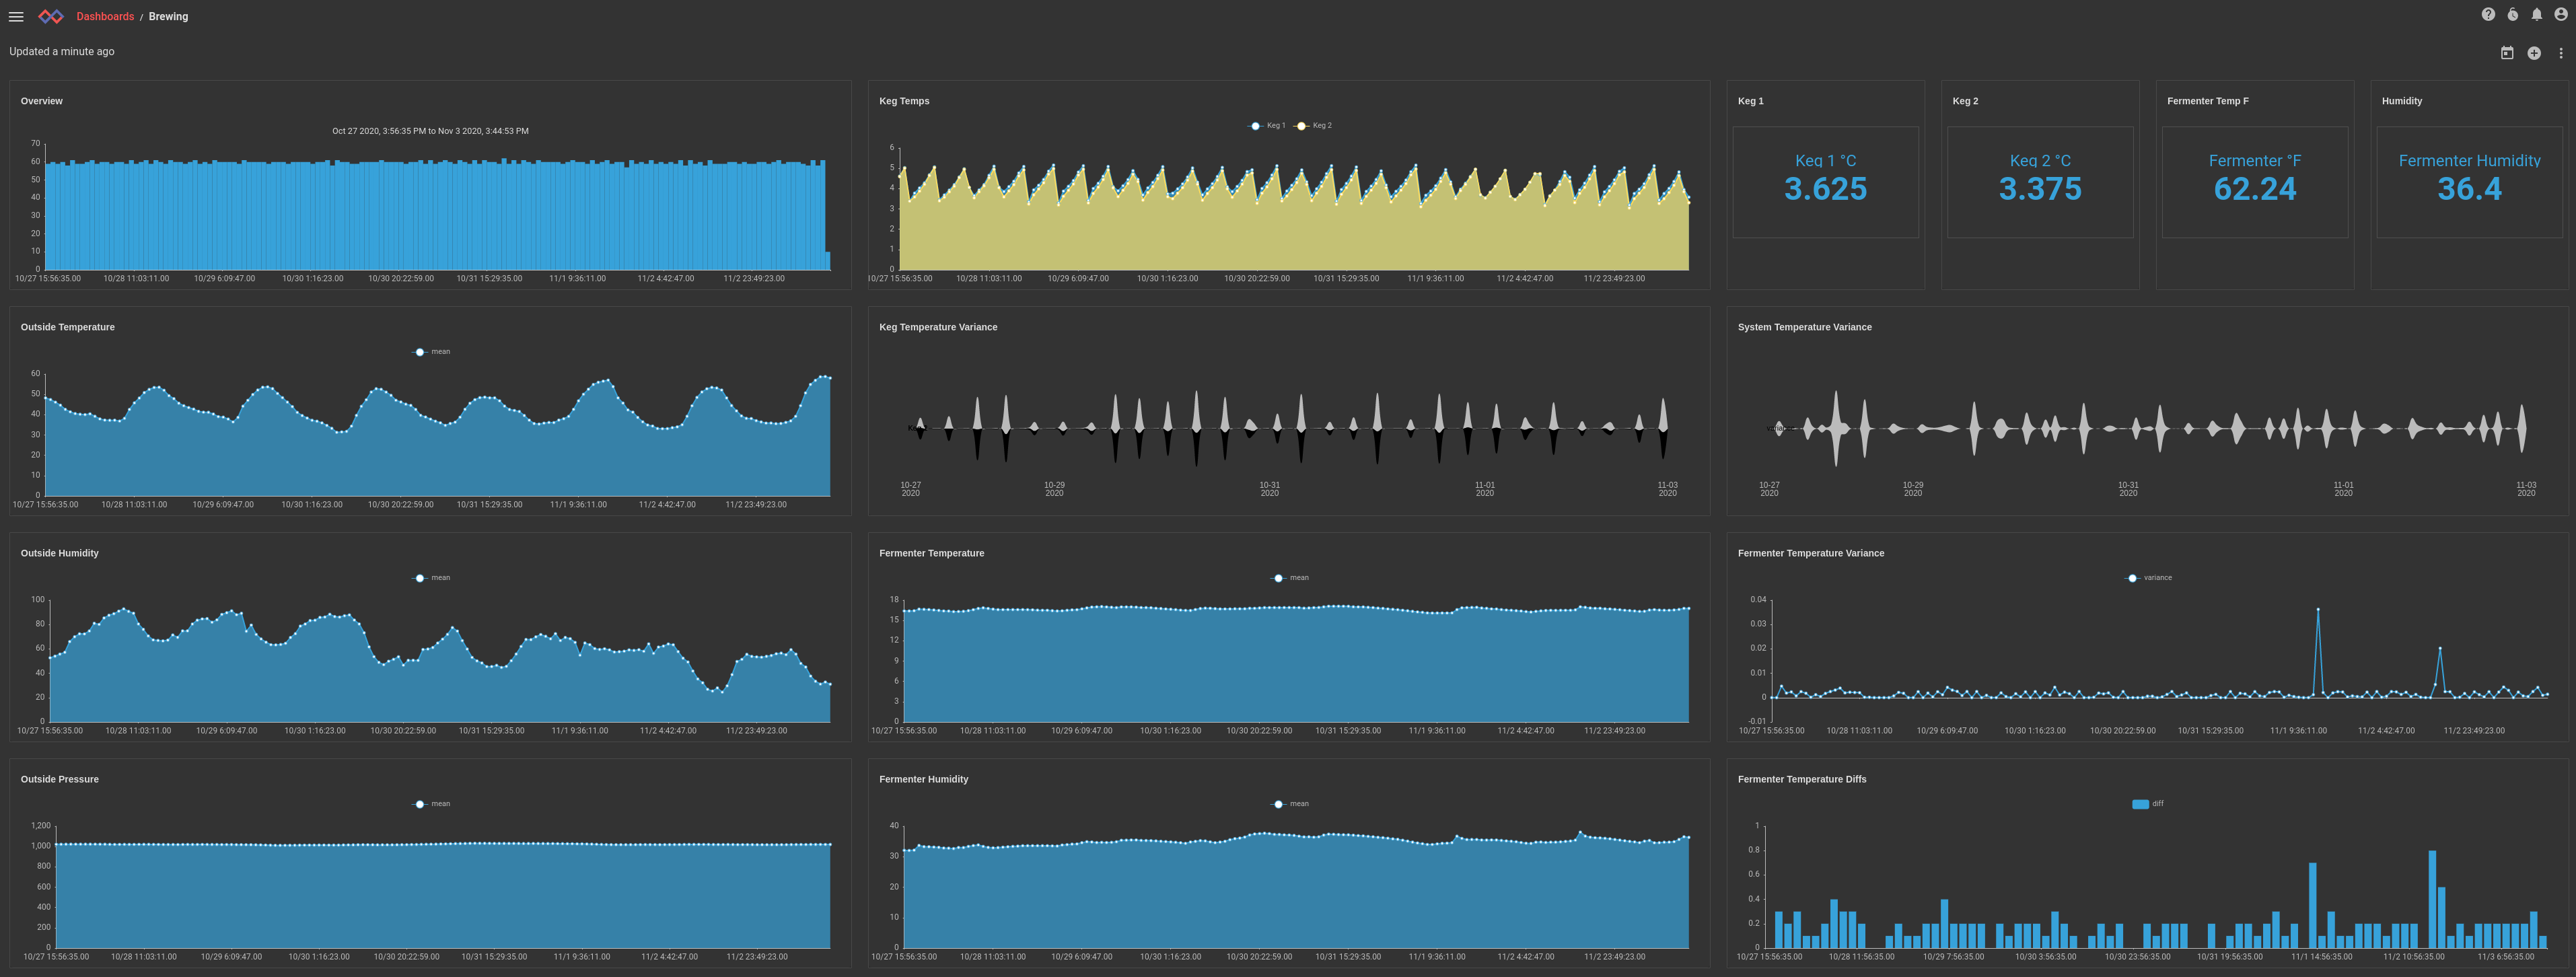
Using that data I am able to then stitch together a cohesive and final view into my homebrew process. A single dashboard that shows me "all the things":
Alerting
After wiring up the control unit, it occurred to me that I should probably rig up some alerting so that I could be notified if my fermentation chamber got too hot or if my kegerator was not ready to deliver a frosty beverage. I decided on an email alert and got to work on a simple script that would alert me if any of my temperature readings ever got out of whack. It's pretty simple, every 5 minutes run the following script. If things aren't right, send an email.
var csv = import("encoding/csv")
var time = import("time")
var fmt = import("fmt")

query = `tag=keg ax temp name ~ Keg | sort by time desc | unique name`
end = time.Now()
start = end.Add(-10 * time.Minute)

ents, err = executeSearch(query, start, end)
if err != nil {
    return err
}

for ent in ents {
    name, err = getEntryEnum(ent, "name")
    if err != nil {
         return err
    }
    curr, err = getEntryEnum(ent, "temp")
    if err != nil {
         return err
    }
    curr = toFloat(curr)
    name = toString(name)
    ts = toString(ent.TS)
    lastTemp = getPersistentMap("variables", toString(name))
    if lastTemp != nil {
        lastTemp = toFloat(lastTemp)
    } else {
        lastTemp = 0.0
    }

    if (curr < -1.0  || curr > 10.0) && curr != lastTemp {
        msg = fmt.Sprintf("%s is out of spec!\nTimestamp: %s\nCurrent: %f\n", name, ts, curr)
        msg += fmt.Sprintf("Last temperature reading: %f\n", lastTemp)
        subj = fmt.Sprintf("Keg %s temp warning %fC", name, curr)
        err = email("loggy.logbot@gmail.com", ["traetox@gmail.com"], subj, msg)
        if err != nil {
            return err
        }
    }
    err = setPersistentMap("variables", toString(name), toString(curr))
    if err != nil {
        return err
    }
}
Hey, remember when I said I hopped on eBay and bought the cheapest thing I could find that could export data and control the kegerator? Remember when I said that it was a blackbox, and didn't have any documentation, and wasn't really labeled? Remember when I also casually mentioned that I would be tying it directly to a 120V AC compressor?
If an alarm bell is going off with something like:
physical device + wall power + compressor + liquid in a glass carboy == expensive mess
I would like to first say "I don't want to talk about it", followed up by "automation is your friend." When I first wired up the control unit I was really excited about the very audible "pop" that could be heard every time the contactor engaged and the compressor kicked on. I soon learned that the pop was a momentary arc on the contactor because the compressor has a pretty beefy inrush current. Well… turns out arcing between two pieces of metal tends to, well… weld those two pieces of metal. After a few dings and curses at my phone in the middle of the night, I roll over to be greeted with the following:

Freezing a beer in a keg isn't THAT big of a deal. Freezing a beer in a glass carboy means you lose the carboy and the beer. Luckily I got to the kegerator fast enough to prevent a total freeze, saving the beer and the carboy. I was able to kick the control unit and the contactor let go, but let's just say I promptly tore out the unit and bought something with a UL listing.
What About That Beer
As any good (or bad) brewer will tell you, keeping good records is paramount for making a good beer. Every batch doesn't always come out the same... the yeast, the ingredients, sanitization, all of it matters EVERY TIME. Gravwell can't really help you with any of that, however it can help with eliminating some variables. Visit any homebrew forum and you will see hundreds of posts of "it tastes like turpentine" and "should it burn my mouth" and "no one said anything about jet fuel." The responses are almost always "what was your fermentation temperature?"
Well, we can answer that in extreme detail. Here is a chart showing the min, mean, and max temperatures over the entire 30 day fermentation of my 7C IPA.
tag=fermenter ax |
stats min(temp) max(temp) mean(temp) |
chart min mean max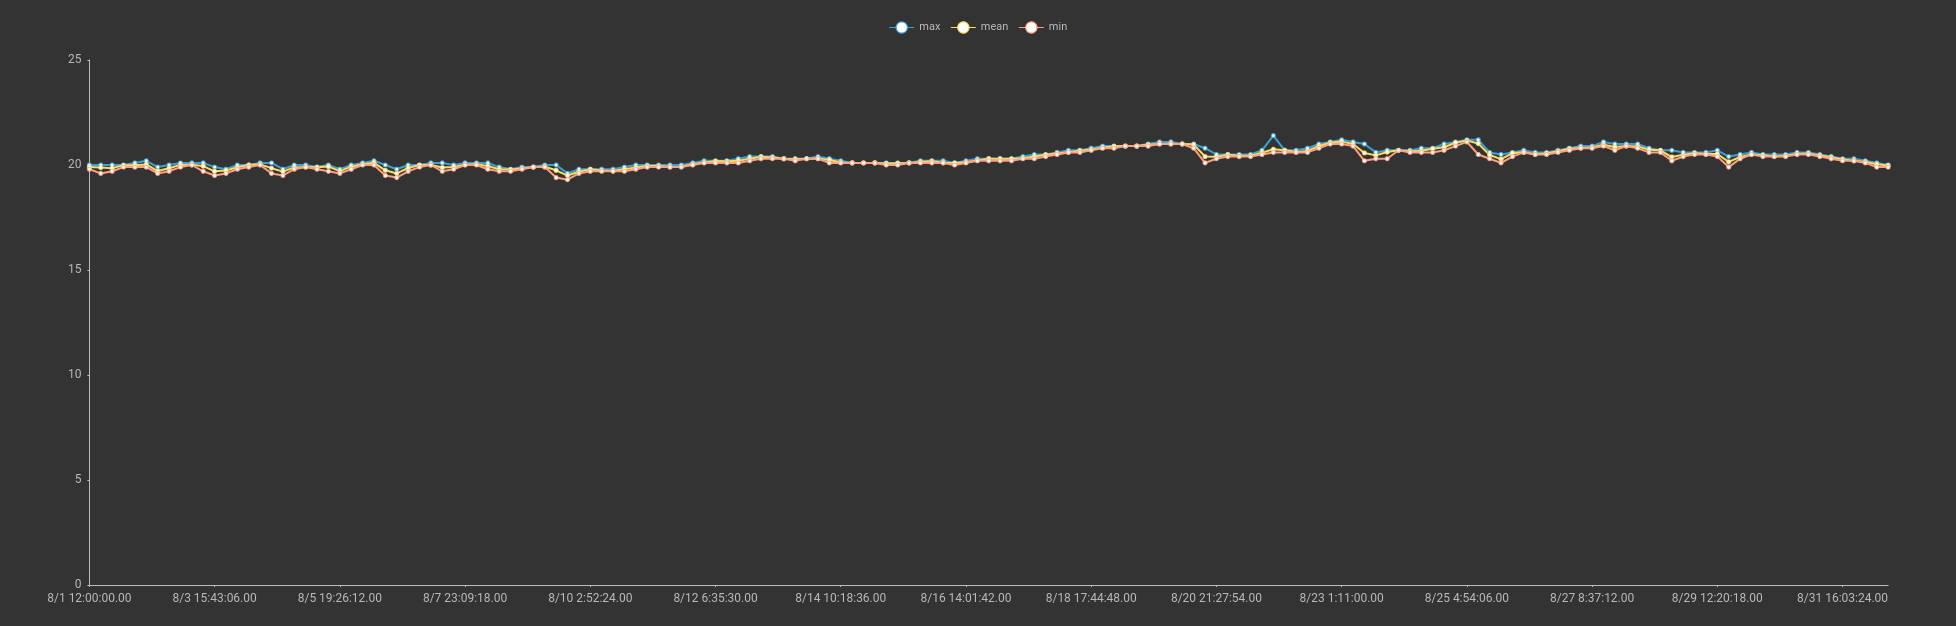
We can see that the temperature was extremely stable, with a small peak of 21.4 degrees C, and this is in August. If this beer sucks, it's not because of temperature control. Spoiler, it didn't suck!
Additional Analysis
The data sets coming into Gravwell are relatively simplistic, just humidity and several temperature values. However, because we have a strong anchor and a flexible query system we can explore and do some interesting data analysis. For example we can look at the temperature variance over long periods of time to see how stable our system is.
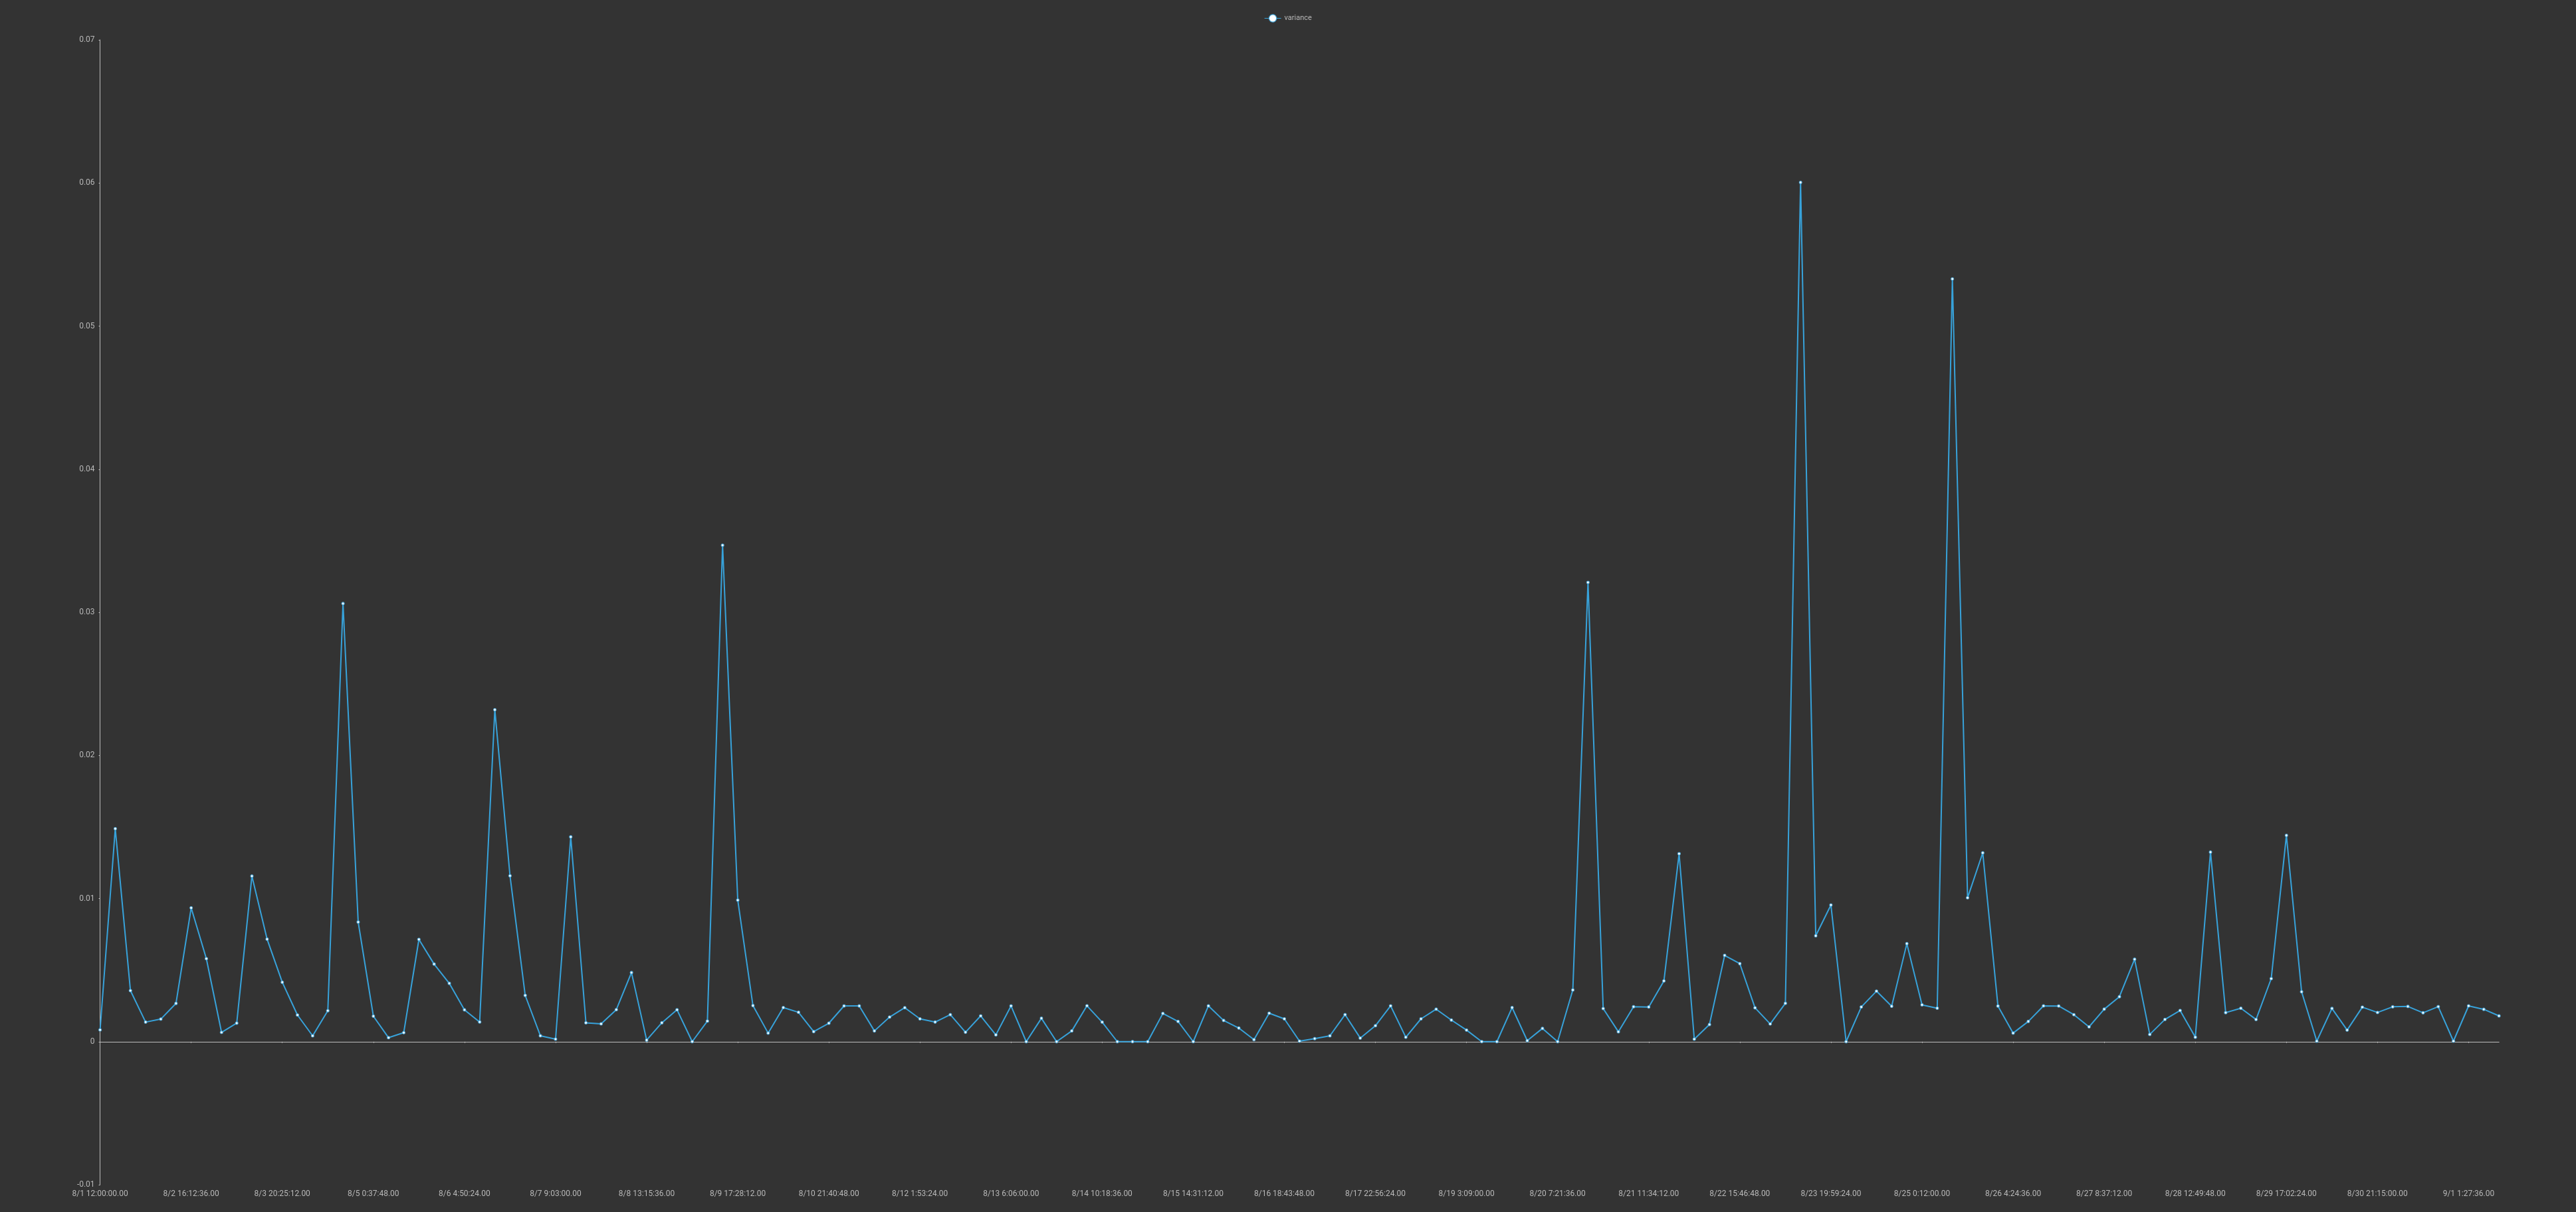
Here we can see a relatively stable system with very well defined peaks. It turns out that those peaks correlate exactly with when I put in a new carboy to lager or changed out a keg. The thermal mass of the liquid gets into an oscillation with the cooling system to cause much higher variance. Using that variance I could roughly count how many fresh kegs had been cycled through my kegarator, and when.
Conclusion
This post was a little bit data, a little bit reverse engineering, a little bit industrial control monitoring, and a little bit booze. When we set out to build Gravwell, ICS was a core use case. ICS systems are often fragile and the consequences of improper operation can be catastrophic whether it be due to equipment failure, process failure, or bad actors. A small homebrew setup in my basement doesn't compare to a large operation with thousands of points. However there was one commonality; the systems don't log well, and you often have to get crafty to get ground truth data. Some monitoring and alerting saved my brew, but we could have just as easily been monitoring process data using packet analysis and caught improper or malicious activity in a packet stream. The ability to ingest and process binary data is critically important in this space, whether we are looking for bad beer or bad actors.
If you would like to know more about Gravwell and how it can help provide total data visibility with a stable and predictable total cost of ownership, hit us up:

 Cheers!