With the release of Gravwell 2.0, Gravwell customers can now deploy multiple webservers tied to a central storage system. This means you can deploy multiple webservers behind a load balancer for better search performance; the webservers synchronize resources, user accounts, dashboards, and search history behind the scenes so users don’t need to worry about which server they’re actually using.
In this blog post, we’ll show how to configure two webservers servers to operate in distributed mode, then we’ll use the Traefik reverse proxy to do load-balancing between the two webservers. For demonstration purposes, we’ll do this in Docker as detailed in our previous blog post (gravwell docker deployment)
The Datastore Server
To maintain state across several webserver, we implemented a new server application called the datastore. The datastore has exactly one task: manage an authoritative copy of resources, user accounts, dashboards, and search history.
When a webserver makes a change to some object (e.g. a dashboard), it pushes the modified dashboard up to the datastore. Webservers periodically check in with the datastore to make sure their local copies are up-to-date; if they find that something has changed or been deleted, the change is propagated locally.
Configuration
We start out by setting up two independent Gravwell webservers and however many indexers we want. The webservers should be configured identically, connecting to the same set of indexers. The Docker+Gravwell blog post (gravwell docker deployment) shows how to set up a Gravwell deployment with only one webserver. We’ll follow all the directions in that blog post, except for the following changes:
We’ll modify the gravwell.conf by adding a “Datastore” option in the Global section:
[global]
Log-Level=INFO
Web-Port=443
Datastore=172.18.0.50
[Default-Well]
    Location=/opt/gravwell/storage/default/
[Storage-Well "netflow"]
    Location=/opt/gravwell/storage/raw
    Tags=pcap
    Tags=netflow
When it comes time to actually launch the webserver, don’t. We will launch the webservers after building and launching the datastore.
The datastore will reside on a separate container, although it can share a node with a webserver or indexer if required in an actual deployment. We will give it the IP 172.18.0.50.
Build the Datastore Image
First, we need to extract the datastore installer; I ended up with a file named gravwell_datastore_installer_2.0.1.sh.
Then we set up a Dockerfile:
FROM busybox
MAINTAINER support@gravwell.io
ARG INSTALLER=datastore_installer.sh
ARG CONFIG=datastore.conf
COPY $INSTALLER /tmp/installer.sh
COPY $CONFIG /tmp/gravwell.conf
RUN /bin/sh /tmp/installer.sh --no-questions --use-config /tmp/gravwell.conf
CMD ["/opt/gravwell/bin/gravwell_datastore"]
(Note that the datastore reads its configuration from gravwell.conf like the indexer and webserver; if you decide to deploy a datastore onto a node that already has an indexer or a webserver installed, the existing config should be sufficient for the datastore)
We create a very simple datastore.conf, which simply specifies the control secrets:
[global]
Control-Auth=SuperSecretControl
Then we build the image:
docker build --compress --tag gravwell:datastore --build-arg INSTALLER=gravwell_datastore_installer_2.0.1.sh --build-arg CONFIG=datastore.conf .
Boot the Datastore
With the datastore image built, it is a simple matter to launch the datastore container:
docker run -m 1024M --cpus=2 --name datastore --rm --detach --net gravwell --ip 172.18.0.50 gravwell:datastore
Boot the Webservers
Now that the datastore is up, instead of running a single docker command to launch one webserver, we’ll use a for loop to create two:
for i in `seq 0 1`
do
docker run -m 4096M --cpus=2 --name webserver$i --rm --detach --net gravwell --ip 172.18.0.1$i --env-file /tmp/web.env gravwell:webserver_2.0
done
You can easily change the “seq” portion of this loop to launch up to 10 webserver containers; you’ll need a slightly smarter script if you want more, since the IP addresses won’t work past 10 webservers.
Testing it out
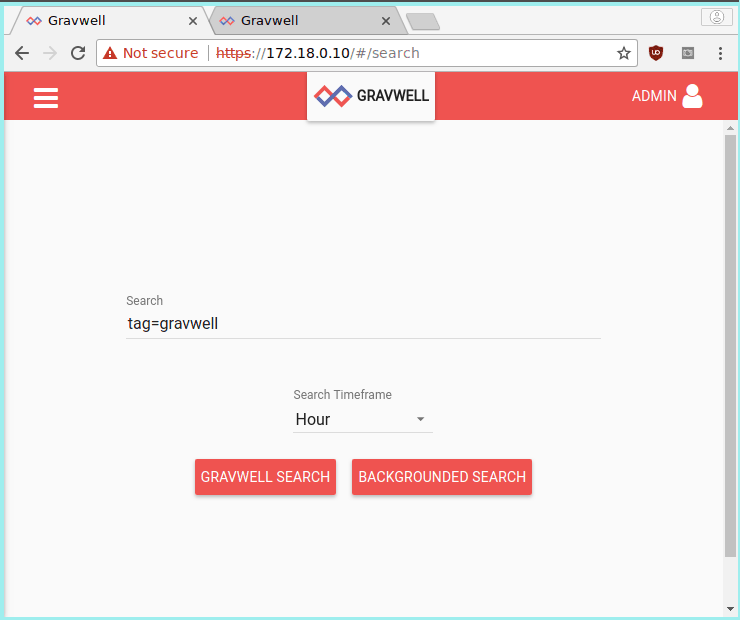
To test the setup, point your web browser at https://172.18.0.10 and https://172.18.0.11. Both should present Gravwell login screens. Log in as “admin” with the password “changeme”. Both should now show the Search page. In the window for 172.18.0.10, do a search for “tag=gravwell”; you should see a few log entries from when the ingesters connected to the indexers (the gravwell tag is used by Gravwell components to log internal events). Now go to the window for 172.18.0.11 (the other webserver), select the menu in the upper left, and click on “Search History”. You should see the search you just executed on the other webserver.
The datastore will propagate search history, preferences, user accounts, and resources between the two webservers, but not saved searches or actual search results.
Load Balancing with Traefik
Although the two webservers are now synchronized, you still have to manually select which one to use. We can use the Traefik reverse proxy (traefik) as a load balancer, so users simply access one IP or URL and are directed to one of the webservers in a round-robin fashion.
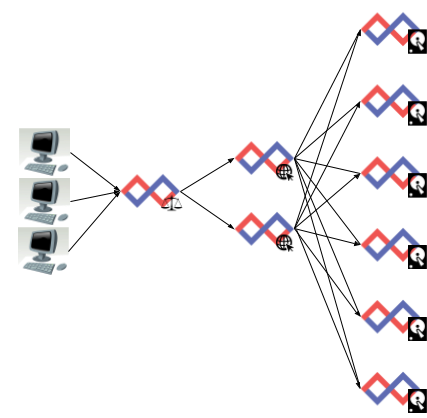
In this example, we’ll run the load balancer in a new container using the Traefik Docker container. We will gather the components we need on the host, then copy them into the container and run it.
First, we’ll generate a self-signed SSL certificate to use with Traefik:
openssl req -newkey rsa:4096 -nodes -sha512 -x509 -days 3650 -nodes -out traefik.crt -keyout traefik.key
(In a production environment, we’d want to use proper certificates, but that’s beyond the scope of this post)
Then we create a config file, traefik.toml. Note that Traefik has its own concept of “frontends” and “backends”; in this case, Traefik backends refer to HTTP servers, so we put the Gravwell webserver IPs into the Traefik *backend* section:
defaultEntryPoints = ["http", "https"]
InsecureSkipVerify = true
[file]
[entryPoints]
[entryPoints.http]
address = ":80"
[entryPoints.https]
address = ":443"
[entryPoints.https.tls]
[[entryPoints.https.tls.certificates]]
certFile = "/etc/traefik/traefik.crt"
keyFile = "/etc/traefik/traefik.key"
[frontends]
[frontends.frontend1]
backend = "backend1"
[frontends.frontend1.headers]
SSLRedirect = true
SSLTemporaryRedirect = true
[backends]
[backends.backend1]
[backends.backend1.loadbalancer.stickiness]
[backends.backend1.servers.server1]
url="https://172.18.0.10"
[backends.backend1.servers.server2]
url="https://172.18.0.11"
Now we start a container for traefik:
docker run --rm --net gravwell --ip 172.18.0.60 -v $PWD/traefik.toml:/etc/traefik/traefik.toml -v $PWD/traefik.key:/etc/traefik/traefik.key -v $PWD/traefik.crt:/etc/traefik/traefik.crt traefik
At this point, you can direct your web browser to http://172.18.0.60. Traefik will redirect you to one of the webservers and set a cookie in your browser so that your session will be “sticky”, meaning your traffic will henceforth go only to that particular webserver.
Load Balancing
The image below shows a search on logs ingested from both webservers. Before performing the search, I opened a new ‘incognito’ browser window and logged into Gravwell via the load balancer (172.18.0.10). I then closed the window, opened a new one, and repeated the process. Note the “Source” fields in the table. They show that the user ‘admin’ logged into both 172.18.0.10 and 172.18.0.11, meaning the load balancer was correctly directing users to both systems.
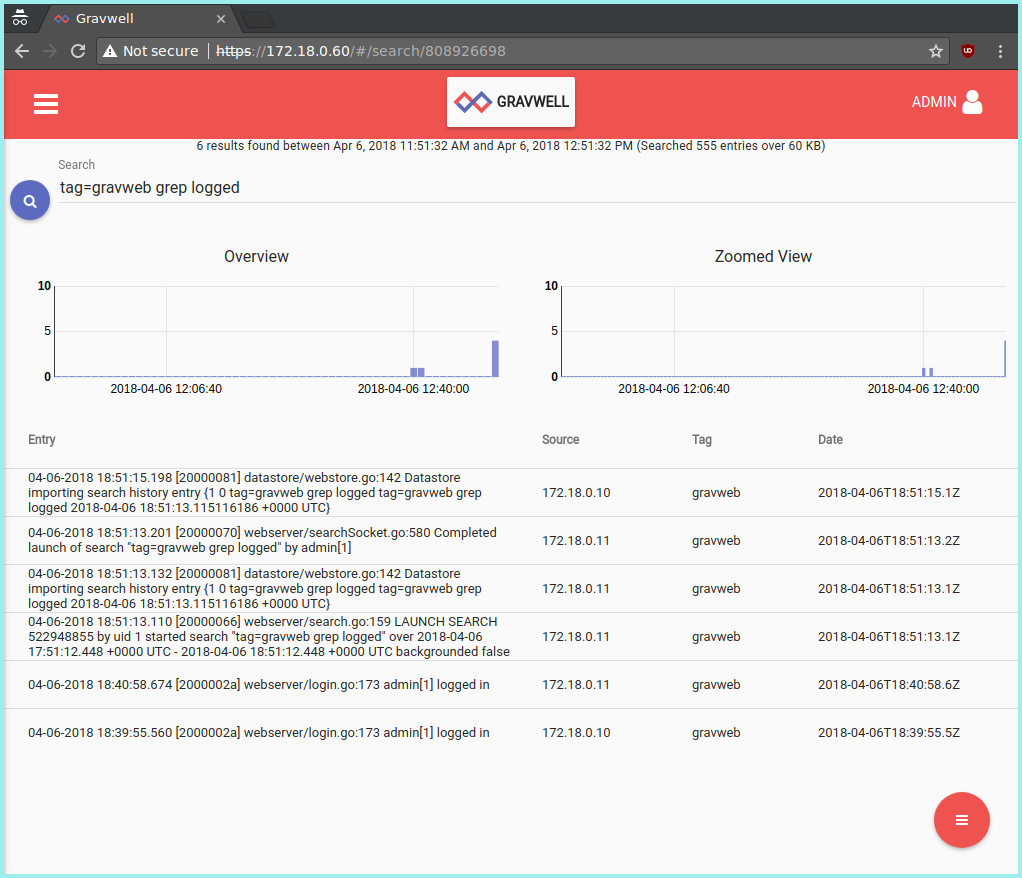
The dance of opening and closing incognito windows was necessary due to Traefik’s concept of “sticky sessions”: it sets a cookie in the browser to remember you, so future traffic can be sent to the same webserver. In order to ‘trick’ Traefik, I had to use fresh incognito windows with no cookies.
Conclusion
With Gravwell 2.0, you can easily load-balance webservers, either by provisioning multiple servers from the beginning or by adding more as you need them. There’s zero impact on users: they’ll never know they’re being load-balanced. In a cloud environment this allows you to scale webservers up and down when needed, cutting costs without reducing performance.
Our next post will dive deep into Gravwell’s new data replication capability, which provides a first layer of defense against data loss by allowing indexers to backup their data to each other and recover it automatically if needed.